
Giving the Simple Gift of Light #3
As I get older, my running routine has become a jogging routine or, sometimes, what I call my slogging routine. A few times a week I get up, pull on running clothes, and stumble out the door. As I start slogging towards the lake, my body sometimes says: “I’m not sure you can do this.”
Most days I tell my body to be quiet and, somewhere around the start of the second mile, I get into a groove and cruise through the rest of the jog.
Getting this new series going feels like the first mile, my mind saying: “I’m not sure you can do this.” I am at the start of my third post, still shaking off the sluggishness and looking at the long, long run ahead and wondering if I am on the right track.
On those tougher morning runs, I tell myself “fine, you can quit, but you can push through the first mile.” That is usually enough.
So let’s push through the kitchen…which will take this and at least one more post to feel covered. Then let’s hope that I find my groove.
In the previous post on kitchens, we picked the places for light fixtures in the Work Zone and Comfort Zone. Today, we round it out and pick the places for the Glare Zone and Safety Zone and fine tune placement for undercabinet lighting and discuss recessed lighting setbacks. Lace up your shoes.
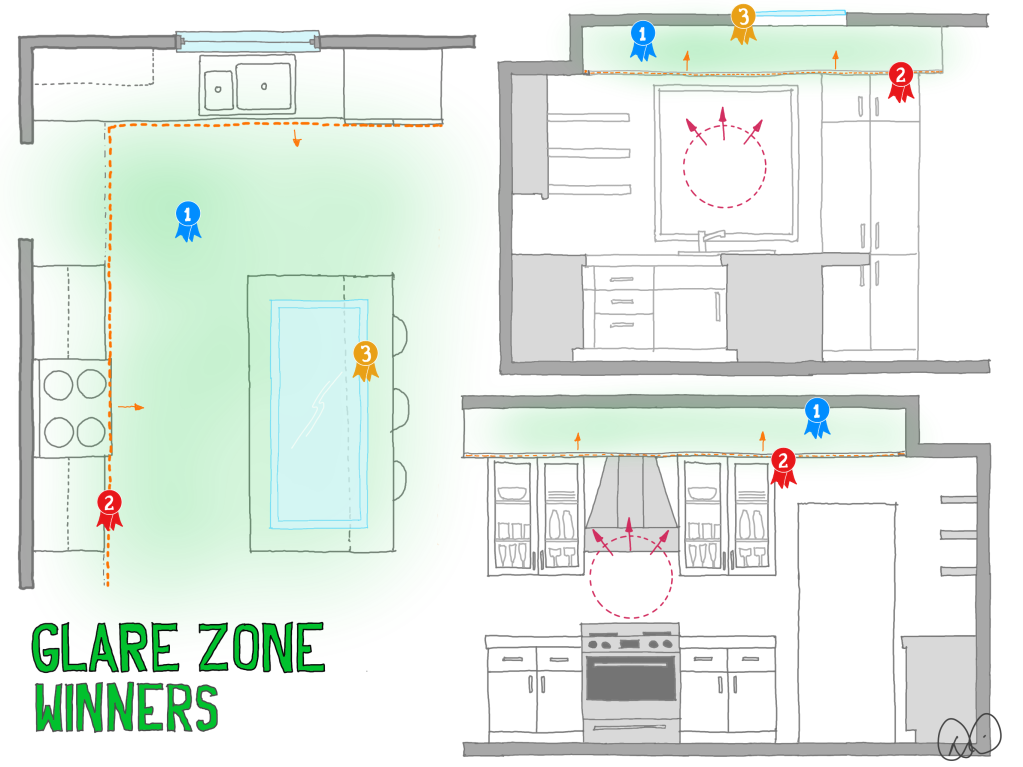
GLARE ZONE: FIRST PLACE
Where is the Glare Zone? Our peripheral vision- the outermost field of vision- is highly sensitive to light and therefore highly susceptible to glare. Why did Mariah Carey rant against overhead lighting? Because it physically hurts us. Sadly, that is where most of our lighting lives, right above us, in our Glare Zone.
So what is the best light for our Glare Zone? No light. In a departure from the norm, First Place for Glare Zone lighting goes to…empty ceilings. Recessed downlights or the much, much worse wafer/disc lights put bright light exactly where our eyes hate it the most- in our peripheral vision.
That means overhead lighting needs to be carefully curated and minimized to keep from disrupting our comfort. We do end up needing recessed lights in kitchens, most of the time, but pushing them to the perimeter can reduce the amount of glare (and tilting them away from our eyes helps).
So if you want to win first place in the Glare Zone, use overhead lighting minimally and strategically.
GLARE ZONE: SECOND PLACE
There is one kind of light I like to put in every room of the house, and the kitchen is no exception to the rule. Soft indirect lighting, or light bounced off walls and ceilings, reduces glare and shadows while reminding us subconsciously of a beautiful sky. This is easy on our eyes and turns the ceiling into an extension of our Comfort Zone, all while making it easier to see what we are doing and who is with us in the kitchen.
Linear LED strips are incredible tools for indirect lighting, taking up a fraction of the space of previous solutions, costing far less, lasting far longer, and using much less energy. If you have a soffit around the perimeter of the kitchen, as shown in the sketch above, a simple horizontal wood trim piece can provide a mounting location for linear LED strips facing upwards. No soffit? Placing the strips directly on top of upper cabinets or upper shelves for a similar effect. The inside of tray ceilings can deliver the same glare-free light in the Glare Zone. Note how we are obeying the optimal directions rule discussed in the first post of the series: light in the Glare Zone is pointed away from our eyes.
Be careful not to depend on indirect lighting for all of your illumination in the kitchen, as you will end up with an overly bright ceiling that can actually make it more difficult to see the counters. Use just enough to cast a soft glow across the ceiling and your Glare Zone will be happy.
GLARE ZONE: HONORABLE MENTION (THIRD PLACE)
Our inspiration for illuminating the Glare Zone is a clear blue sky, the kind we see on a summer day, yet with our eyes shielded from the direct glare of the sun. In some ways, then, the perfect Glare Zone lighting is…a big opening in your ceiling so the real sky is visible.
I love natural light indoors because that is what our bodies really want. In some cases, skylights can be wonderful additions to kitchens, bringing in free, beautiful, natural light every day. Just make sure you have a way to shield your eyes from the direct sun if your skylight is positioned to let it in.
Why are skylights an honorable mention and not first place? For two reasons. First, not every kitchen can have a skylight, unless you don’t mind looking underneath the bed in the room upstairs from your kitchen island. Second, skylights are awesome during the day but the reverse of helpful at night, creating a big dark hole in the ceiling. A perfect world might be both indirect electric light around the room and a lovely skylight or two in the middle.

SAFETY ZONE: FIRST PLACE
With fixtures placed in the Work, Comfort, and Glare Zones, we can now address the final area of our kitchen: the Safety Zone. We need light to walk around our kitchens at night, but usually we do not need to flood the entire kitchen just to get a drink of water. Instead, carefully placed light in the Safety Zone can make our movement safer while adding a healthy dash of relaxing comfort to our homes.
The optimal direction for light is always away from our eyes, so light in the Safety Zone is best when located below our waistlines and pointed towards the floor. In any kitchen with an island, underneath the island countertop is the most effective and efficient way to deliver light to the Safety Zone.
Overhanging bar tops make a perfect mounting place for Safety Zone lighting for a couple of reasons. First, islands are typically located near the center of a kitchen. This means any lighting there will spread out around the center of the kitchen, often delivering enough to comfortably light the entire Safety Zone.
Second, island countertops are anywhere from 36-42” above the floor. This distance is about as high as you can get without becoming a source of glare for someone seated nearby, so it becomes the optimal height for mounting Safety Zone lighting that can then spread out much further than light mounted lower (such as in a tow kick).
Finally, light underneath and island bar top is much, much easier to install than light in a toe kick. Having three feet of working space makes installation pretty simple.
You might find that placing linear LED strips underneath your island top will deliver everything you need in the safety zone for the average kitchen. There are a few runner-up solutions I use when a little more is needed or desired.
SAFETY ZONE: SECOND PLACE
Of all the lighting strategies in residential lighting, toe kick lighting may be the most controversial. Linear light strips are mounted inside the toe kick reveal of base cabinets, pointing downwards towards the floor, creating a bright line of light where cabinets meet floor.
This can tough to deliver well. Working in the toe kick area is constrictive, making installation difficult. Pointing light strips directly downwards can lead to glare on glossy floors, negating much of the gain. And pointing the light strip back towards the cabinet makes the toe kick area very bright, potentially drawing attention to the dust bunnies (not in my kitchen, of course, which is always spotless, at least as long as I take off my eyeglasses).
But there is a place for toe kick lighting in our Safety Zone strategy. Anytime there is no nearby island we need another way to introduce glare-free light in the Safety Zone, and the toe kick emerges as a good solution.
There could be another benefit to toe kick lighting: reduced risk of falls, especially in the elderly. Falls are pretty serious business for older adults and finding our balance in darkness is particularly challenging. Linear toe kick lighting creates a clear break between the floor and cabinets, and our brain can use the resulting strong line to find balance. If we can balance better, we fall less. That makes toe kick lighting a pretty solid strategy for any home that is occupied or visited by seniors.
SAFETY ZONE: HONORABLE MENTION (THIRD PLACE)
I plan on taking us through every room of a typical house and, if you stick with me through the whole adventure, you are likely to get tired of me recommending recessed step lights as the first-place choice for Safety Zones. They are like a secret weapon for lighting designers: relatively inexpensive, relatively easy to install, and dramatically positively impactful.
The only reason they are an honorable mention/third place choice in kitchens is that most walls in kitchens are covered up with cabinets, eliminating the convenient mounting places for recessed step lights. But most kitchens will have eight inches of wall somewhere….
Recessed step lights, which you might recognize from theaters or outdoor steps, should be called indoor path lights and can be used anywhere you move. I like to place them near doorways and transitions from one space to another. In the kitchen shown, they go next to the doorway and to the transition to the dining area off to the side.
Trust me on this one. We regularly use 40-50 indoor path lights in a large home, and they make clients love us.
Congratulations! You have now PICKED THE PLACES for kitchen lighting in all four zones. If you are exhausted from the run, you can walk the rest of the way. If you want to finish with a sprint, the next two illustrations showcase a couple of precise details for lighting placement in kitchens.
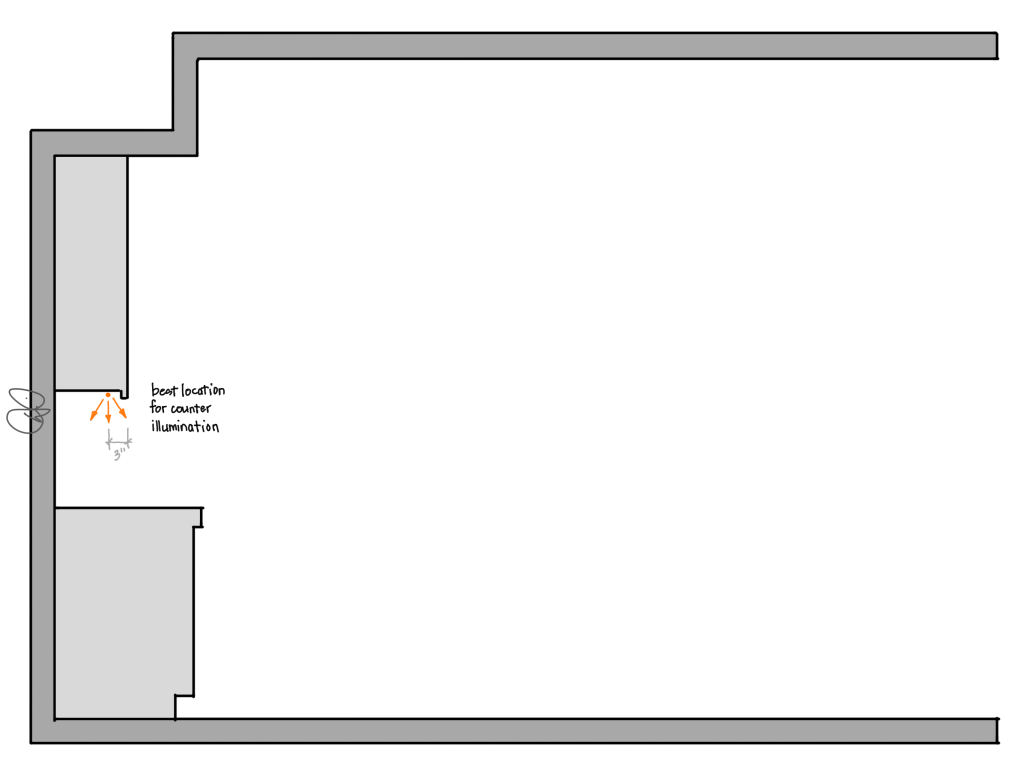
PICK THE PLACES: UNDERCABINET DETAILS
Undercabinet lighting won First Place in the Work Zone, though exact placement is hotly contested. You can deep dive HERE and in multiple other posts on the blog but consider this illustration the executive summary. If you want your countertops (the Work Zone) well lit, I recommend placing linear LED strips about 3” back from the face of the upper cabinets, pointed directly downwards towards the counter.
It is best practice to place the LED strips in an aluminum channel to protect the strip and dissipate heat that can damage the LED chips; a frosted lens will smooth out the light and reduce shadow lines and soften reflections in glossier countertops.
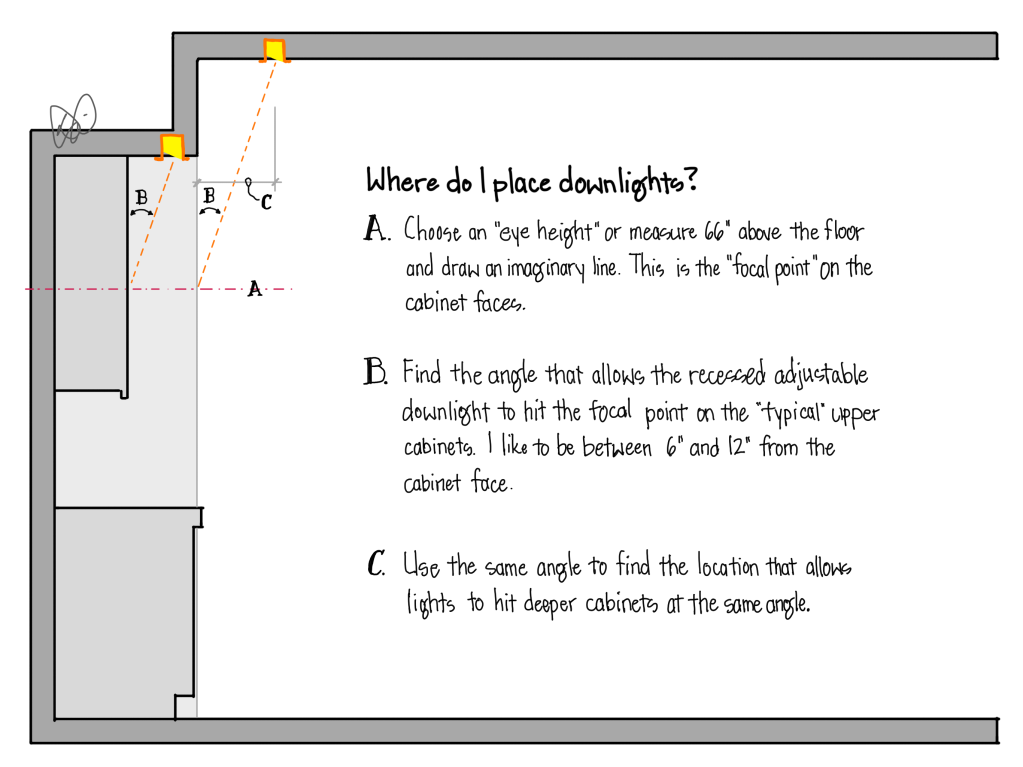
PICK THE PLACES: SETBACKS
Looking at one of our typical kitchen lighting plans can lead to confusion when you notice that our recessed adjustable downlights seem to dance around the ceiling in random patterns. In other words, recessed lighting in a professionally designed kitchen will almost never be in straight lines…at least not the straight lines we can see at first glance.
The reason is that light travels in a straight line, making geometry critically important to determining light fixture placement. If a cabinet is deeper than its neighbor, its light will be further out from the wall. If the ceiling above one cabinet is higher than its neighbor, the light will move again further from the wall.
Where should they go? See the illustration for step-by-step instructions.
Whew. Time to cool down and stretch a bit. Make sure to hydrate. My next post in the series will dig into PICKING THE PRODUCTS needed to make this an awesome kitchen, and who knows how much energy it will take.
Check out more of the GIVING THE SIMPLE GIFT OF LIGHT series HERE.