Giving the Simple Gift of Light #4
When I was much younger, I looked at box full of chocolates with a mix of excitement and trepidation. I knew, somewhere in the box, would be a delicious chocolate with a creamy caramel center, but I was deathly afraid that I would bite through a cherry, or into coconut, or into some other ruinous concoction.
Today, I pretty much like them all. But when it comes to picking light fixtures for projects, I am just as opinionated as my younger self- and equally afraid of making the wrong choice.
I wish it was easier to choose light fixtures, but the ever-evolving matrix of technologies, costs, controls, functionality, and aesthetics is a little bit like a box of chocolates that constantly rotates its selection while your back is turned. Wait, there was a caramel here a minute ago, where is it now?? So please keep in mind that what I write below should be taken with a grain of sea salt as products will change.
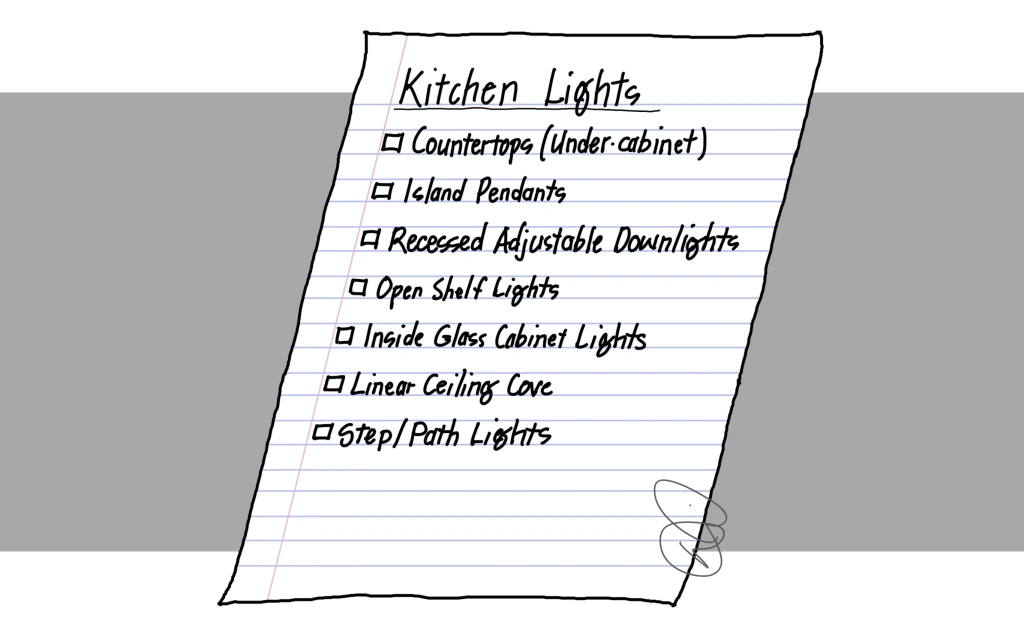
Okay, let’s get to work. The first step is to look at the kitchen plan and make a list of the light fixtures needed. I am going to use the kitchen plan developed in THIS post and THIS follow-up post. Once you have the list drawn up, it’s time to pick the products.
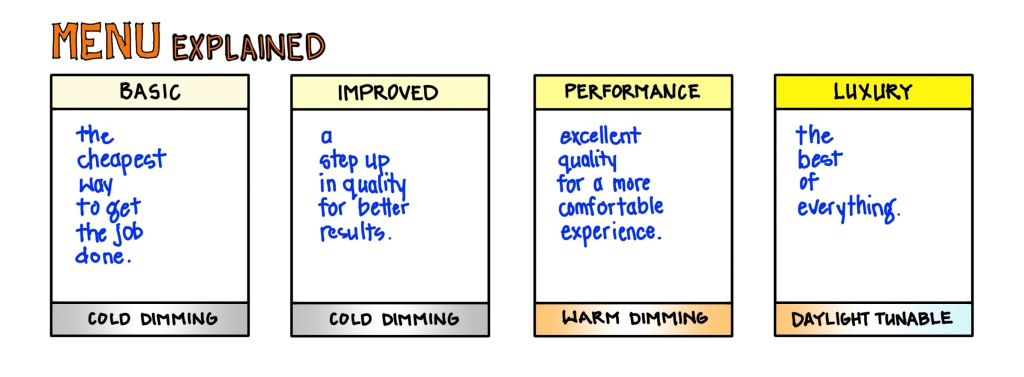
My goal for the entire blog is to increase access to better lighting through simplification of what can be a complex task. For this post, I am going to try out a fixture menu structure and make recommendations within each of four categories:
BASIC
This category will contain fixtures that are common in most homes built today. Sadly, most of the time these will be pretty sad fixtures, notable for their low price and detestable for their high glare. So think of this category as a last resort or a what-not-to-buy category. I get it, sometimes this is all the budget allows for, but stretch up when you can.
IMPROVED
This should be the first step up for someone looking to improve their lighting without breaking the bank. These fixtures will usually do a better job than BASIC in one way or another and lead to better results.
PERFORMANCE
Fixtures that are better built, offer better performance, and often offer additional features mark the entry into the PERFORMANCE category. This is most often the baseline for custom homes and professional lighting designers.
LUXURY
There are several different ways a fixture can find itself in the LUXURY category. They might offer a nominal performance improvement or moderate technology improvement, or they may simply be built better to last longer. They may also be built with premium finishes so they look great.
At the bottom of each menu item you will see a color technology bar that indicates whether the fixtures are COLD DIMMING (dimmable LEDs that do not shift color temperature like incandescent bulbs), WARM DIMMING (usually LEDs that gradually warm when dimmed like a sunset), and DAYLIGHT TUNABLE (LEDs that can shift from warm to cool in synchronization with daylight). There are additional technologies out there like full dynamic color-changing, but these are pretty niche.
So think of the menu as not-so-good, good, better, and best. Ready? Here we go.
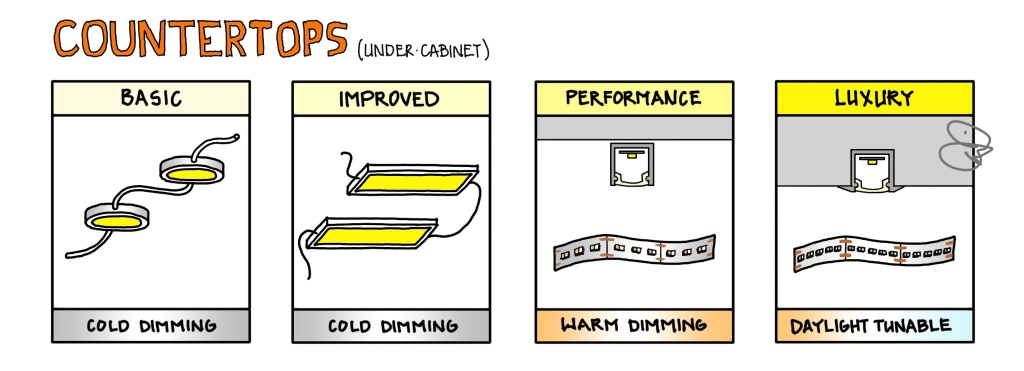
COUNTERTOPS: BASIC
We want an evenly illuminated countertop and that means spreading light out everywhere. My first kitchen used halogen “puck” lights and was a big step up from most houses, but every kitchen since has been lit with linear LED strips. Pucks are available in LED now, but I rarely, if ever, recommend them. If you use these, space them closely together (about 8”-10”) to reduce shadows and increase brightness.
COUNTERTOPS: IMPROVED
LED bars or panels can deliver a decent amount of light in a softer manner than pucks, but come in a limited range of sizes. If you are using pre-built cabinets, it might be difficult to arrange the fixtures in a way that avoids shadows. In my opinion, LED panels are the best concept for lighting a kitchen counter, but the fixed sizing means I rarely recommend them.
COUNTERTOPS: PERFORMANCE
I recommend a lot of linear LED strips – you’ll find them in half the categories of kitchen lighting. Why? These can be quite a bit fussier to install but offer a remarkably high degree of flexibility. They can be cut to fit under nearly any sized cabinet and come in a staggering array of technologies. I’m showing WARM DIMMING LED strips (often called tape) installed in an aluminum channel with frosted lens. I personally prefer strips with 400+ lumens (a basic unit of light output) per foot for countertops or doubling up strips with lower lumen outputs.
COUNTERTOPS: LUXURY
Stepping up to DAYLIGHT TUNABLE strips gives a better range of options, though it will require more sophisticated control systems for easy operation. To further improve the final look, strips and channels can be recessed into smooth cabinet bottoms for a clean, tailored look.
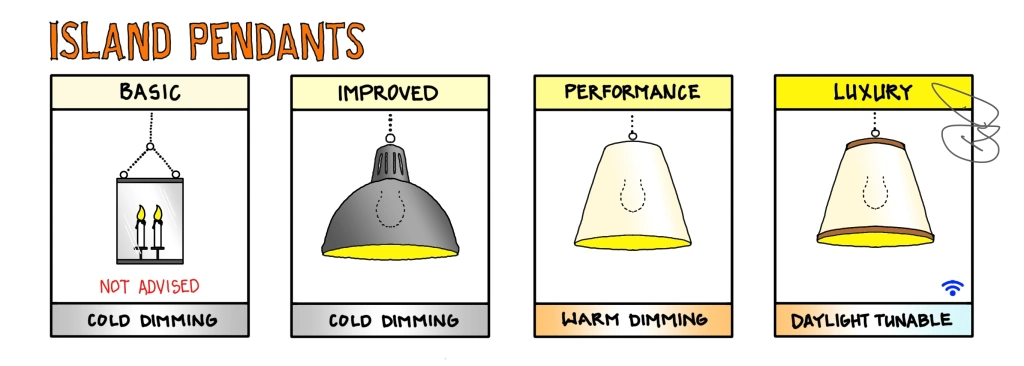
ISLAND PENDANTS: BASIC
If I ruled the world, I would outlaw about 90% of decorative pendants. Why? Most are constructed only to look pretty when turned off, not to provide good, glare-free light when turned on. If you have a pendant with clear glass, or one with bulbs pointed towards the ceiling, or with a fancy LED shape that puts narrow lines of light everywhere, chances are good that your island will be dark and your eyes squinting to keep out the glare.
ISLAND PENDANTS: IMPROVED
If you can, step up to a pendant that has its light source pointed towards the countertop. Shaded pendants, where the light source is recessed up in the shade, can push more useable light downwards while minimizing glare.
ISLAND PENDANTS: PERFORMANCE
The best island pendants, in this designer’s opinion, are those that primarily push light downwards but also softly diffuse some of that light into the space. This approach makes us feel more comfortable and lights the faces of our family and friends gently. A good WARM-DIM lightbulb will make it easy to set a relaxing vibe after dinner prep is done.
ISLAND PENDANTS: LUXURY
You can spend anywhere from $50 to $50,000 on a pendant (seriously), so luxury pendants can just be a step up in construction quality from PERFORMANCE. We need the same kind of light, so adding in a smart DAYLIGHT TUNABLE bulb can improve the flexibility of the pendants.
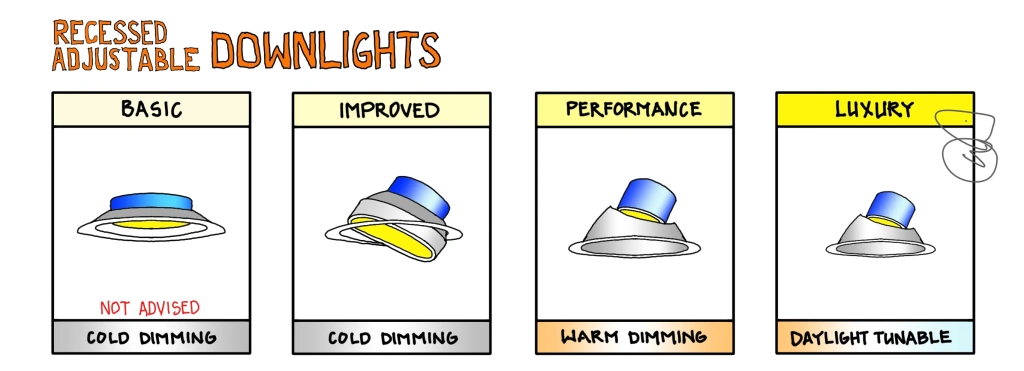
RA DOWNLIGHTS: BASIC
Recessed Adjustable Downlights can be very useful tools in kitchens, but a surprising number of homes now feature glare-inducing wafer (or disk, pancake, panel) lights that do a terrible job pushing light to the countertops. Avoid these if you can- they do not even qualify as recessed, adjustable, or downlight.
RA DOWNLIGHTS: IMPROVED
Lights that pivot are often categorized as gimbal-style and can offer a good step up in functionality. Try to avoid those that are really just wafer lights that pivot – you want a fixture with a reflector or multi-faceted lens to push light. If the face of the light source just looks like a frosted disk, keep looking.
RA DOWNLIGHTS: PERFORMANCE
A true performance recessed adjustable downlight will allow for aiming (tilting) of the light source up inside the ceiling where the mechanisms are hidden. This allows the light source to be further above the ceiling and the general rule is that the higher the recess, the lower the glare. I personally like those with frosted silver reflectors, but mirror-like silver reflectors will reduce glare even further. Black reflectors are better still but can draw attention in light ceilings when turned off. Expect to pay several hundred dollars for a good downlight in this category.
RA DOWNLIGHTS: LUXURY
Tunable recessed adjustable downlights usually cost more (and cost more to control), so I’m categorizing them as luxury. If we can get the market to shift, these could be made more affordably and that would make me very, very happy. Daylight Tunable fixtures that range from a warm 1800°Kelvin (K) to a crisp cool 4000°K are my current favorite fixture. Luxurious fixtures can also be smaller and have premium construction and finishes. I think a 2-3” diameter fixture with 1000 lumens and a 40° beam will satisfy most situations.
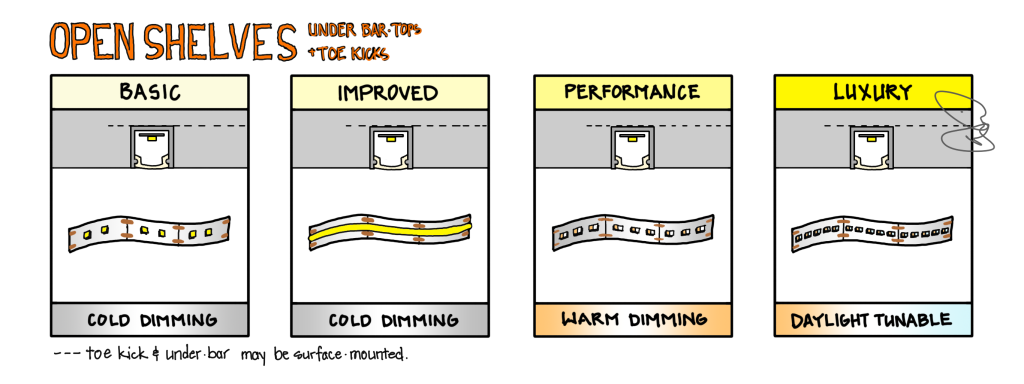
OPEN SHELVES: BASIC
I recommend LED strips for open/floating shelves, underneath bar tops, and in toe kicks. At the lower end of the cost range, you will find LED strips with LEDs spaced further apart and often cutting lines every 3-4” or so. This can lead to “dotting,” where you see the light from individual LEDs instead of a softer, continuous line of light. I think aluminum channels should be recessed into open shelving, but they can often be surface-mounted when used in toe-kicks and underneath island bar tops.
OPEN SHELVES: IMPROVED
Linear LED strips now come in what is often called COB varieties that produce a more continuous line of light. This reduces the dotting mentioned above and is easier on the eyes. I’m placing it in this category and not the higher levels because color-shifting technologies are slower to the COB lineup. COB, in case you are wondering, stands for Chip On Board and refers to the fact that these strips are made with hundreds of tiny LEDs spaced closely together and then covered with a continuous band of light-emitting phosphor.
OPEN SHELVES: PERFORMANCE
The step up here is simple: WARM DIMMING strips can make for a much more relaxing vibe after sunset. There are strips in this category at a number of different price points, but they are pricier due to their low level of adoption. Toe kick lighting can be 200 lumens or so; Shelves and under bar tops can match the kitchen counters at 400 lumens.
OPEN SHELVES: LUXURY
As I mentioned before, DAYLIGHT TUNABLE technologies that allow the light to shift from a warm 1800°K to 4000°K are my current favorite, and having these in shelves, toe kicks, and under bar tops can allow you set the mood just right while balancing the colors of the room.
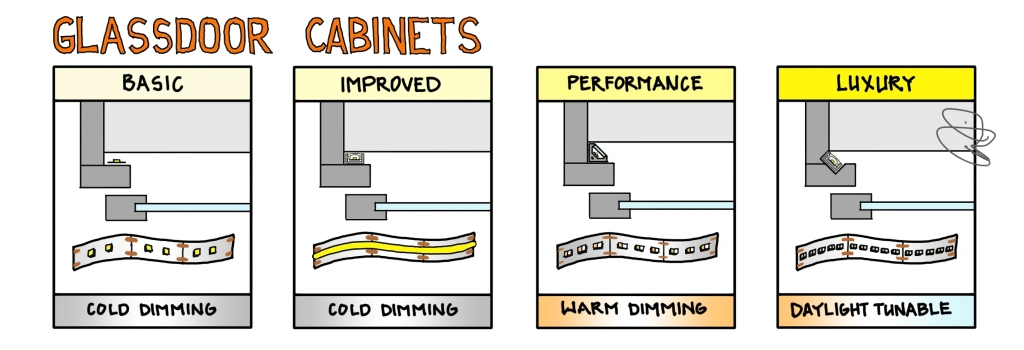
GLASSDOOR CABINETS: BASIC
See the Open Shelves discussion above for notes on the linear strips I recommend, which are the same in this application. Details differ, however, and begin with the simplest of all installations: attaching the strip directly to the inside face-frame of the cabinet. I have this as BASIC because it can cause dotting reflections in glassware, but it is a significant step up from an unlit cabinet.
GLASSDOOR CABINETS: IMPROVED
Cutting the shelves back a bit to allow for an aluminum channel will protect and diffuse the light strips for a more professional installation. Want to make it look even better? Paint the insides of the cabinets a dark color; this will help draw focus to the items instead of the cabinet back.
GLASSDOOR CABINETS: PERFORMANCE
There is some debate over whether the 45° angled aluminum channel shown here is a better installation method, because it can push light towards the center of the cabinet better but also risks introducing some glare. A mockup will be the best way to determine suitability. WARM DIMMING tape will be a nice upgrade.
GLASSDOOR CABINETS: LUXURY
DAYLIGHT TUNABLE is the next level up, but clever millworkers can also devise details that recess the aluminum channels and light strips into the cabinets themselves. This can deliver the better light of the 45° angled channel while minimizing the potential for unsightly glare.
(Check out the OPEN SHELVES section for specific linear strips recommendations)
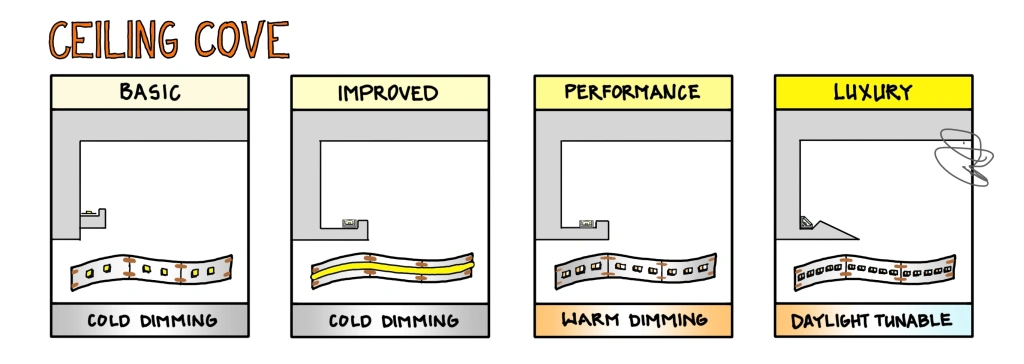
CEILING COVES: BASIC
Adding soft indirect lighting to a room does not require extensive construction; a simple routed 1X2 can conceal the linear LED strips and attach easily to the walls with nails, screws, or even construction adhesive. I have done this in my own homes and in luxury homes- the detail works just about anywhere.
CEILING COVES: IMPROVED
A slightly wider cove, say 4” or so, can soften the light on the vertical face of a wall or tray ceiling. Just make sure that the top of the lens is even with – or just slightly below – the lip of the cove for maximum softness of light. Recessing the strips down into a deep cove will result in unsightly shadows and trapped light.
CEILING COVES: PERFORMANCE.
The only major step up from IMPROVED is to upgrade your linear LED strips to WARM-DIMMING for a more comfy after-sunset vibe.
CEILING COVES: LUXURY
DAYLIGHT TUNABLE is a key upgrade, as discussed before, and a super-fine luxury look can be achieved with specialized “knife-edge” channels that mud right into the drywall for a seamless look. The light strips (and cove) all but disappear.

PATH/STEP LIGHTS: BASIC
Theater-style path lights, also called step lights, were developed to allow patrons to safely navigate ramps and steps in darkened theaters. In homes, the same style of fixture provides reassuring pools of light along key pathways through the home. Low-cost interior path lights often have slanted louvers to direct light downwards while shielding your eyes from glare. Almost all path/step lights will emit fixed white light, so consider 2700°K warm white or even warmer if available.
PATH/STEP LIGHTS: IMPROVED
There are some lovely step lights for under $100USD that feature a modern design with recessed light sources and “scoops” that allow the light out and down to the floor. This is the style I use the most because it also eliminates any significant protrusions from the wall and looks attractive all day long. There is a bit of a high brightness to the scoop, a trade-off that should be considered.
PATH/STEP LIGHTS: PERFORMANCE
Interior path lights that completely hide the light source (and without any reflecting surfaces) will be the most comfortable at night, though they have to stick out of the wall to accomplish the task well. I wish there were more products in this category that I liked, but a good number of them are so shallow and shielded that you mostly end up with light on the baseboards and not across steps and floors. Look for units that push the light source out an inch or so and spread light out widely.
PATH/STEP LIGHTS: LUXURY
There are several ways to hit the top of the line in interior path lights: get tiny, choose premium finishes, or make them disappear. Tiny lights, as small as a nickel, all but disappear but are also towards the top end of costs. Premium finishes are available in some higher-grade path lights and a nice brass or polished steel will feel luxurious. And my favorite luxury move? There are path lights that can be mudded into the wall and painted to match, leaving only a small groove visible that emits light.
Whew. If you are still with me, you deserve a finisher’s medal. Few rooms of the home are as complicated as kitchens, and this has been a long list and long post. Got questions? Post a message and I’ll do my best to respond.
Wondering why I am not recommending specific products with links for purchasing? There are so many options in each category that narrowing it down will take a lot of work and, perhaps more importantly, the list would require frequent updating as products change. Maybe someday….