
Giving the Simple Gift of Light #6
Welcome to the capital city of relaxation, also known as your Living Room. In my own home, the living room is notable as the location of The Couch. Yes, I capitalized it and no, I do not really refer to our couch that way. In fact, it is kind of a sad couch, but we hesitate to replace it while our aging dog is enjoying it….
The couch in our living room is notable because we sit on it nearly every evening after dinner. Sometimes we catch an episode of something on the TV (after we sit through the “Sailing through the heart of Europe on a Viking longship…”message from our sponsor). More often, we read and talk with each other. On occasion, we might entertain guests in the living room or play a board game, but the couch is the anchor.
Why does this matter to lighting? It is important to consider how you use a room and sitting on the couch, if you boil it down to the essentials, is precisely what we do in our living room. Every night. When we PICK THE PLACES for lighting in our living rooms, imagine what you see from the couch and everything will fall into place.
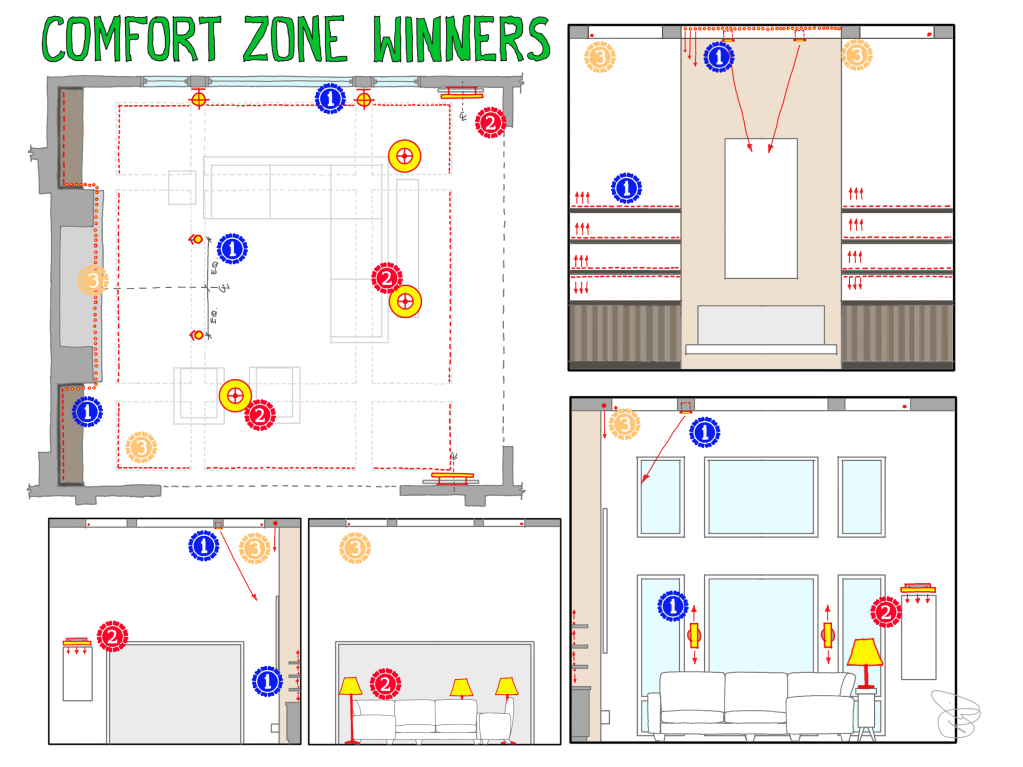
COMFORT ZONE WINNERS
We go to the living room after dinner because it is the most comfortable space for hanging out and relaxing, so it makes sense to start with the Comfort Zone when considering lighting fixtures and positions. The Comfort Zone, which is discussed in more detail elsewhere, is essentially where you would see the sky if you couch was sitting in the middle of a grand prairie. In other words, the Comfort Zone is all around you and a little above you. Light in the Comfort Zone needs to be reflected off other surfaces and not directed into your eyes, somewhat analogous to the sun’s light bouncing through the atmosphere to light up the sky.
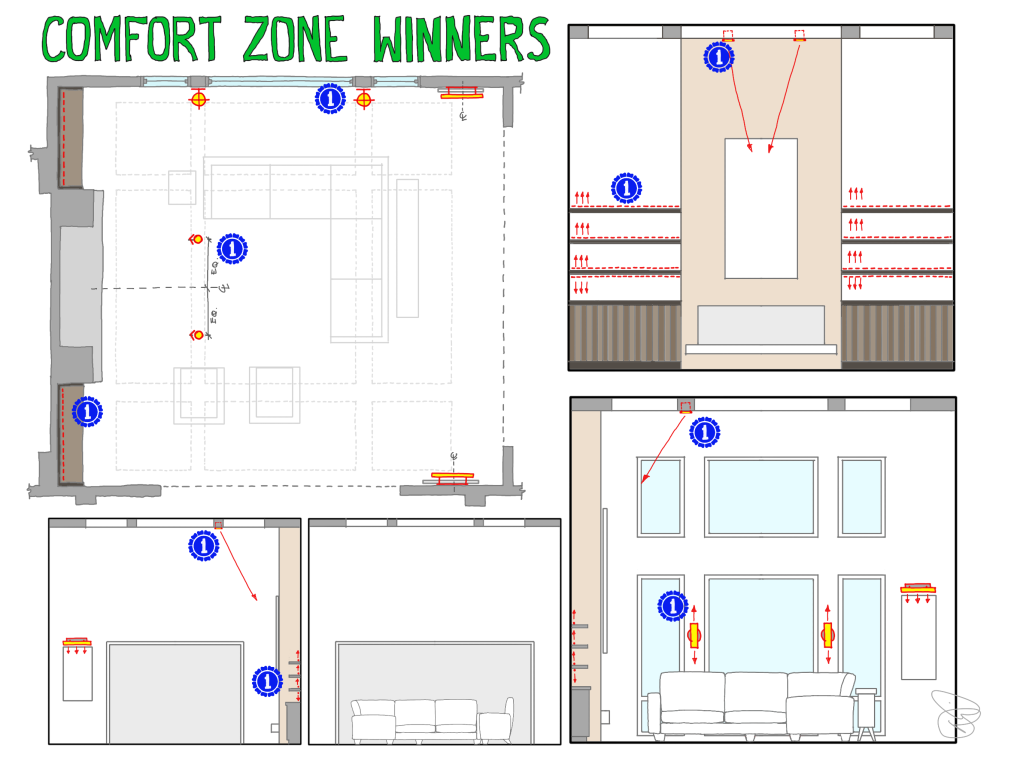
COMFORT ZONE: FIRST PLACE
I have three different first place winners for the Comfort Zone, each a solution for a different segment of the zone. First, if there is a central feature of the room, such as a fireplace, you may want to bounce light off of it. If there is art above the fireplace, even better, but even a lovely stone will work nicely. This light, usually from recessed adjustable downlights, will draw attention to the focal point and reflect gently into the room.
Second, if there are shelves in your living room, consider illuminating them. I personally do not need to light my bookshelves because 1) other lights in the room give me enough to see and 2) I rarely pick something from my shelves, opting instead to grab something from my library stack. The shelves become decoration, but their location in the Comfort Zone also makes them a perfect place to reflect light into your eyes and the rest of the room. Linear light concealed in shelves can be perfect for this, so long as you point the lights away from your eyes.
Finally, I added two wall sconces on the window wall. During daylight hours, the windows will transmit natural light reflected off nearby buildings, trees, and other natural and constructed features. Windows are usually centered in our Comfort Zone because that is where our eyes naturally rest and where we can see best; it is for these same reasons that we may want to consider adding light in the same area for after sunset. Wall sconces – specifically those that cast light up and down but not directly into your eyes – can alleviate some of the discomfort of darkness while adding comfort to the space. It can be tricky to get these sconces installed if framing is packed in without room, but if possible the effect is worth it.
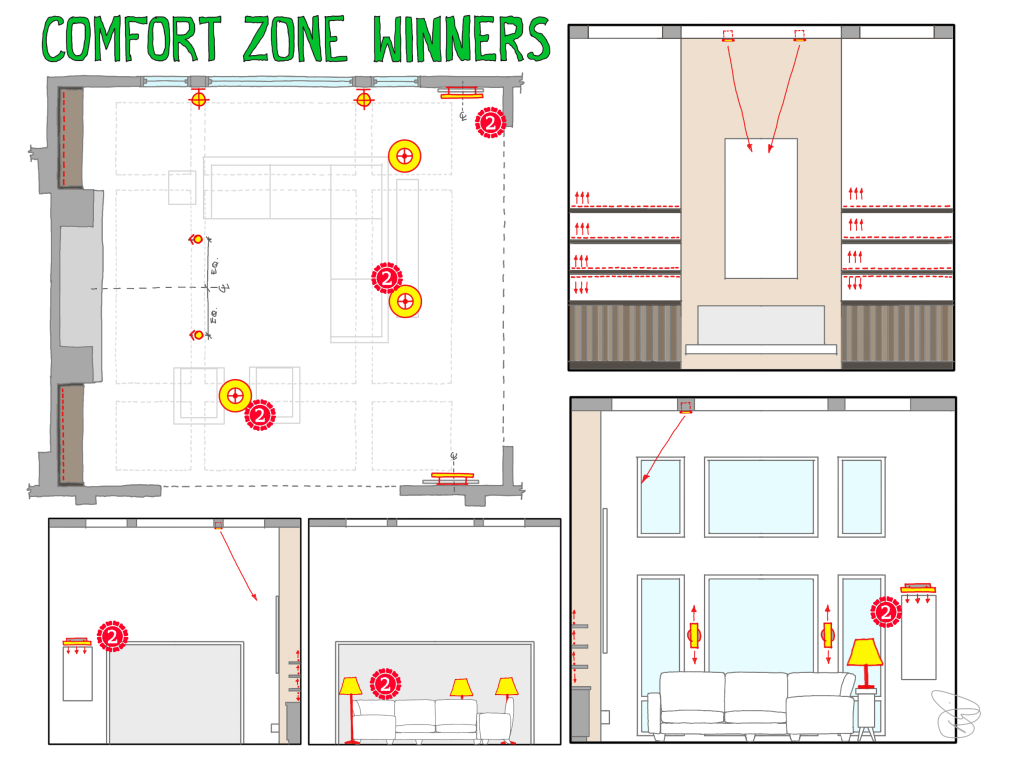
COMFORT ZONE: SECOND PLACE
Lighting up art over a fireplace is a great start, but you can continue adding light to the Comfort Zone with picture lights on other walls. Picture lights are purpose-built wall sconces that direct light towards art, photography, or other wall hangings. That light, after beautifully highlighting the artwork, bounces softly into the room, right where our bodies want it for comfort. Picture lights are also great tools in double-height spaces. Getting good light on a painting or photograph from a 20’ ceiling is tricky and increases the possibility of glare, so lowering the light source and connecting it to the wall may be more comfortable.
I also have lamps in the Comfort Zone as second-place winners. Lamps will become even more important when we discuss the Work Zone, but those with soft fabric shades can add lovely and comfortable glow to a living room (or just about any room, for that matter). Scatter them around the room where you anticipate reading, knitting, or any other close task, and consider placing them opposite your favorite seating place as well. The opposing lamps will give you a soft glow in the Comfort Zone while the one next to you will light the book. Lamps are also the best way to get light onto the faces of your guests or loved ones. Forget the Film Noir shadowed look and get some good, soft lamps into your living room.
I know that not everyone loves the look of lamps in their living room. I wish I could wave a wand and give you more options, but light needs to go where it needs to go if you want comfort and function. You can choose lamps in any style you desire, but make sure the shade gently diffuses light.
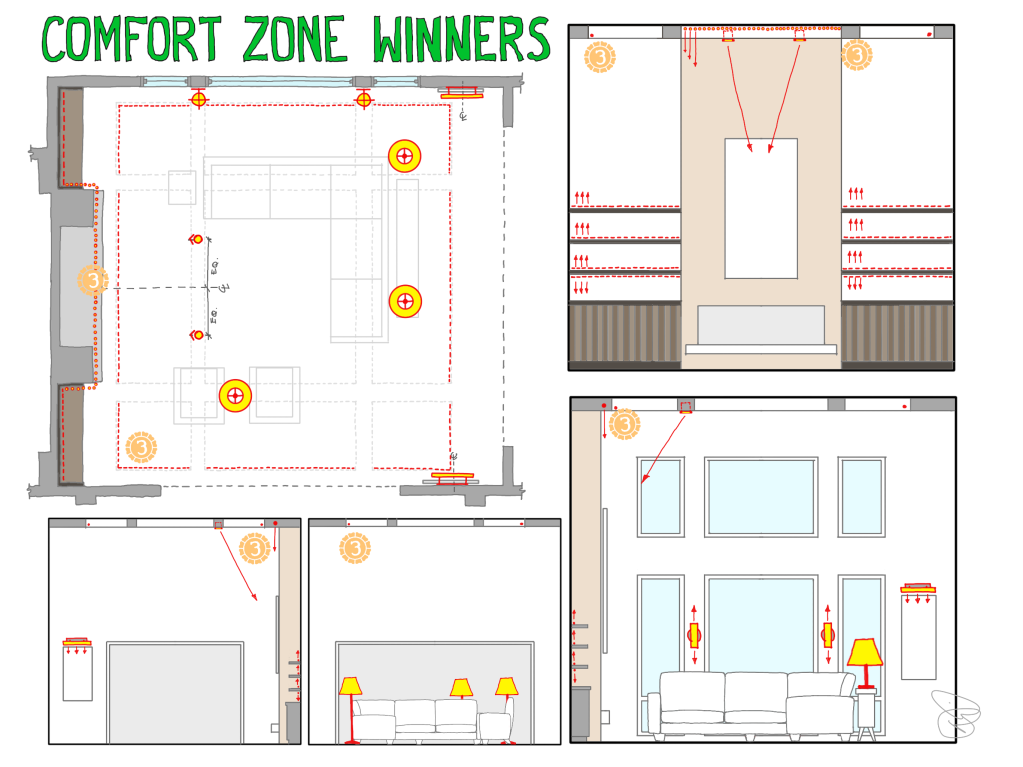
COMFORT ZONE: THIRD PLACE
The portion of the ceiling directly overhead as we sit on the couch is largely invisible to us unless we lean backwards and bend our necks. But a portion of the ceiling, most often around the perimeter, may be visible even as we sit and watch television. Try this: look up from your laptop or tablet and direct your eyes to the furthest part of the room you can see without bending your neck. Can you see the ceiling without bending your neck? Then that part of the ceiling is in your Comfort Zone.
The ceiling in our example has a lovely beam structure with coffered sections. When focusing on the Comfort Zone, circling the perimeter with linear cove-style lighting will deliver what is needed without requiring the extensive installation and added cost of illuminating every side of every coffer. The soft light that bounces into your eyes will be comforting; it will also provide a nice glare-free layer of light throughout the room, what one colleague calls “walking-around light.”
I also added a slot grazer above the fireplace to cast a “blade” of light down along the surface of the chimney. This works particularly well for surfaces clad in textured materials like stone, wood, or some fabrics. Grazing light is placed close to the surface to exaggerate the shadows of each rise and fall, providing a lovely sense of depth. Note, however, that grazing is generally not an attractive solution if the surfaces are intended to be smooth, like sheetrock. Grazers should also be tucked into a ceiling slot or hidden behind a valence – I’ll get into that in the Get Creative post later.
How did choose which lighting technique to award first place, second place, or third place in the Comfort Zone? I consider impact, such as how many seats will be positively affected, and installation hassle or cost, and even the style of the room. In this case, the floating shelves and fireplace art are likely to be seen by anyone sitting in the room, so they jumped to the top of my list. Every room, however, may end up with a different pecking order.
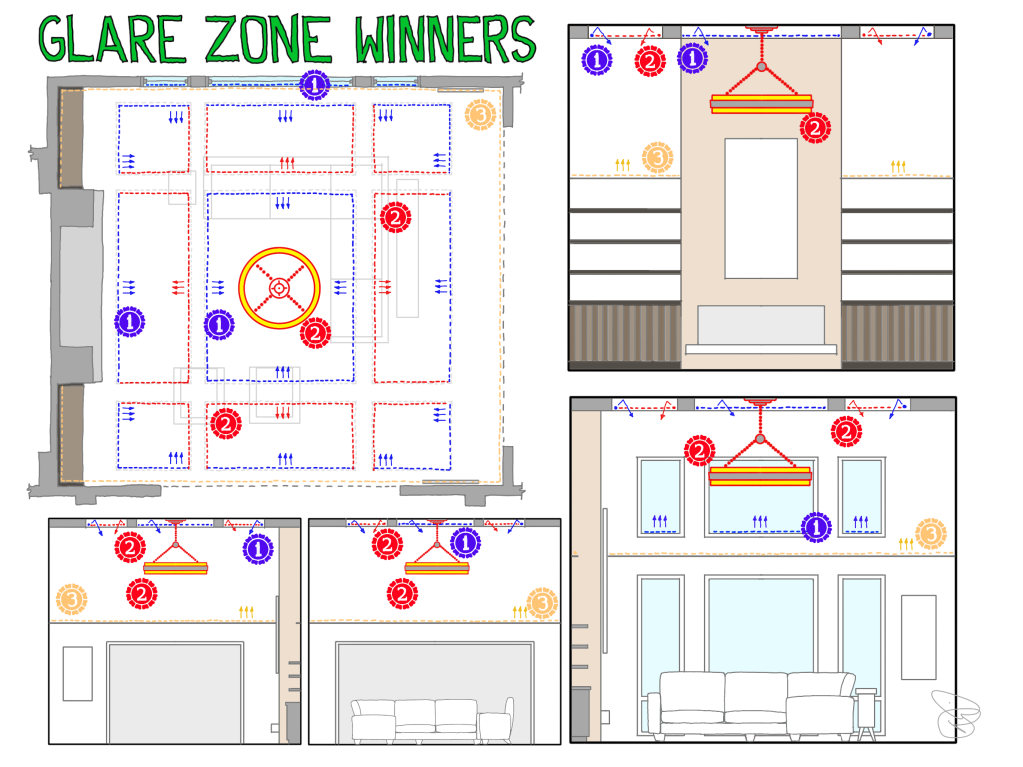
GLARE ZONE WINNERS
Our peripheral vision, packed with rod cells, is highly sensitive to light and the area I like to call the Glare Zone (or “No-Glare Zone,” depending on my mood). This can be to our left and right but, since we often observe rooms from many angles, the sides of our vision are included in the Comfort Zone. Directly above our heads, however, should be its own zone, free of subconscious pain-inducing glare.
The principle of glare-reduction is quite simple: shield your eyes from concentrated bright light. End up on the service end of a powerful flashlight in your eyes while camping and you will smack the offender, but how often have you smacked the people that littered your ceilings with concentrated bright light? There is a better way…or several better ways.
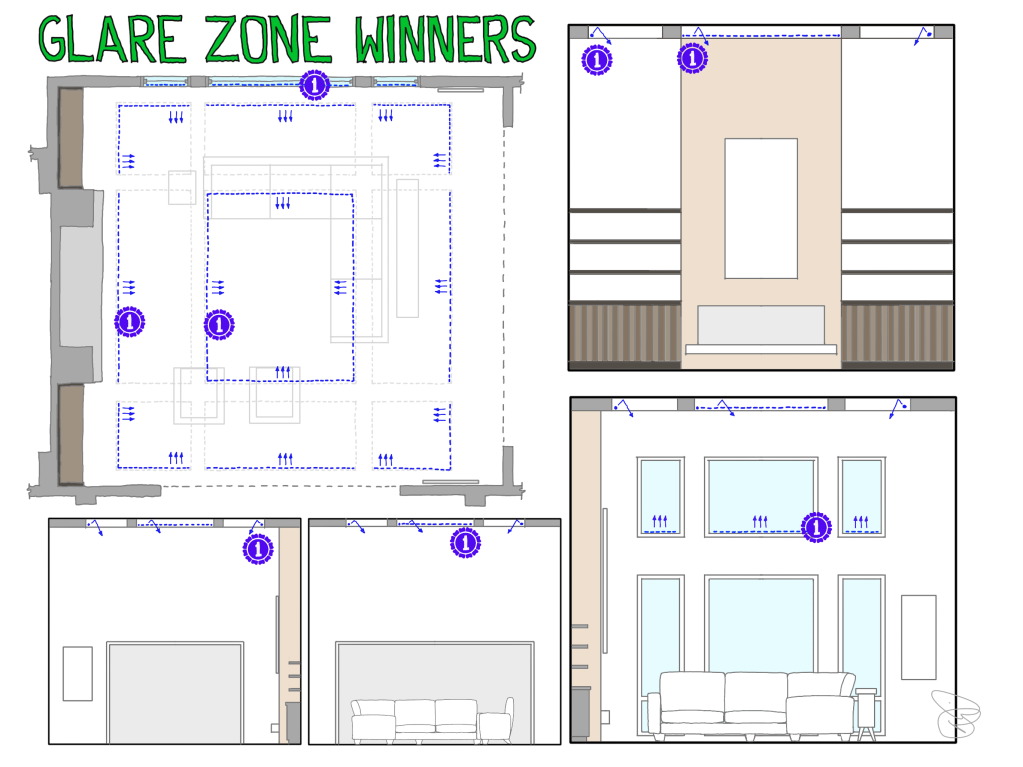
GLARE ZONE: FIRST PLACE
The outer perimeter of the ceiling is a perfect place for an indirect cove as the light can be bounced off the ceiling, which spreads it out into a gentle rain over the entire room. Be careful not to make the cove to bright (dimmers are essential) or too small, or you end up creating more glare than you eliminate. The perimeter of the ceiling also does double-duty as soft light in your Comfort Zone, which make (so far) two very good reasons to add this layer of light to your home or projects.
Directly overhead, in the center of the room, is a large rectangle framed by ceiling beams. Bouncing light off the ceiling here can deliver some very useful light into the seating area with very little glare, essentially the opposite of a grid of recessed downlights (bright, concentrated, glare-inducing sources).
A final first place finisher: clerestory or transom windowsills.We add a strip of linear LED lighting (sometimes referred to as tape light) at the bottom of the window, facing upwards. This does a fantastic job of adding a dash of light to the ceiling but is even more valuable as little splash of light on the window frames. Our team has used this detail in a number of projects and the photos keep coming in showing how great it looks. No glare, plenty of beauty. The first time I used the detail, what seems like a long time ago, the homeowner told me it was her favorite light in the entire house.
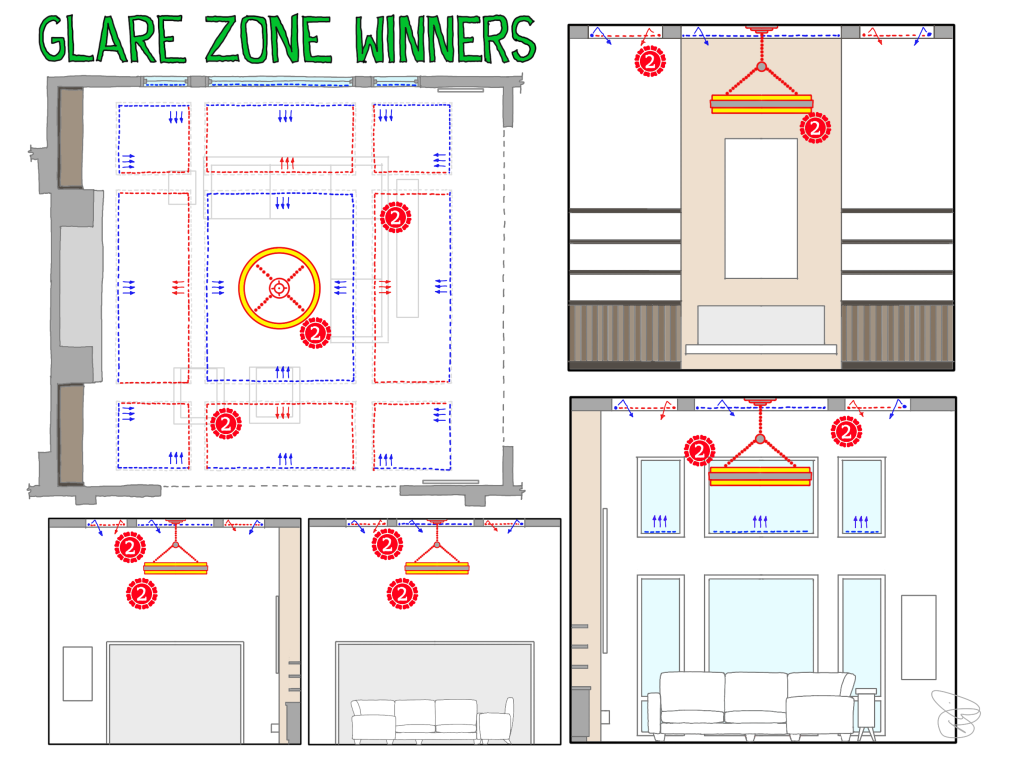
GLARE ZONE: SECOND PLACE
“We need a statement piece.”
Large chandeliers or pendants in tall spaces like stairwells, entries, and living rooms can certainly make a statement. Sometimes the statement may not be entirely what was intended: “We like clean, bold, modern style…and lots of glare in the faces of our friends.”
Chandeliers and pendants overhead in living rooms fall squarely into the Glare Zone, and that means they need to abide by the same rules as mentioned before: avoid concentrated bright light. Pro Tip: a bare light bulb is almost always a concentrated, bright light and should be avoided whenever possible. I’m talking to you, practically-ubiquitous-candelabra-chandelier. To protect your glare zone, choose fixtures that shield your eyes and emit only soft, subtle light. And please, please, please put it on a dimmer and dim it way down, do not depend on it for “useable light.” That would create glare.
I also stuck the rest of the ceiling coves into second place. The look is great, but it can get pricey and complicated. Corners are tricky, and the more linear feet of cove in a room, the more product you will buy, the more dimmers you will need, and the price easily doubles while the impact does not. So use sparingly.
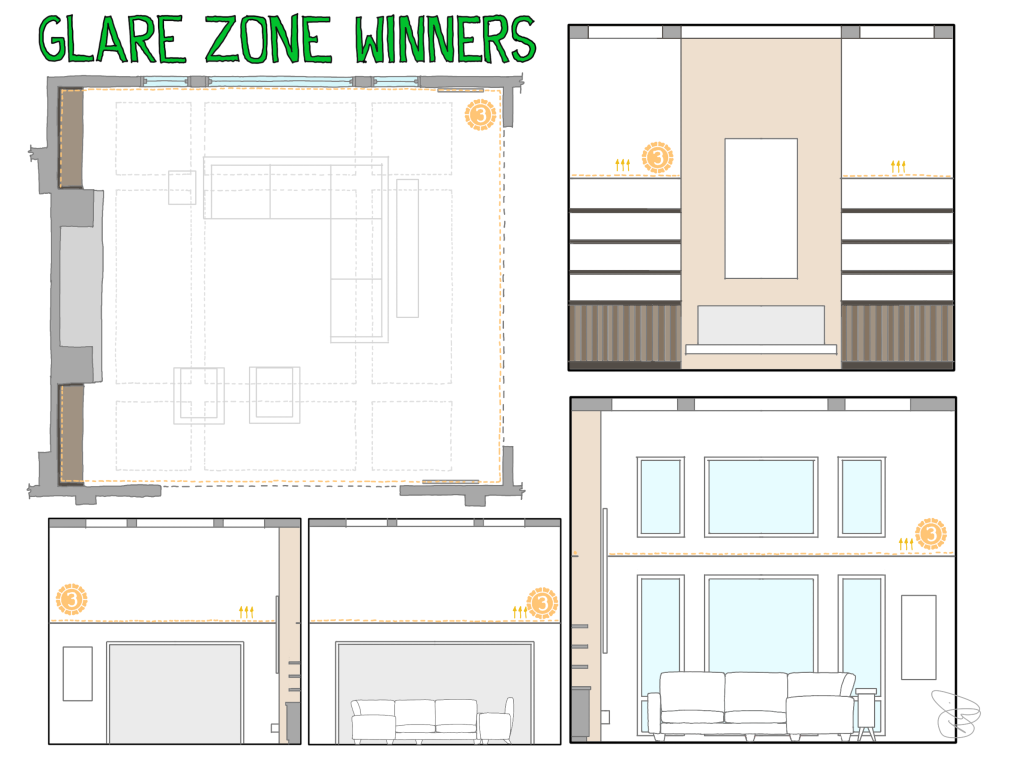
GLARE ZONE: THIRD PLACE
Tall spaces can create some awkward places. In the lower left of the diagram above, note the huge expanses of blank drywall above the large opening to the hall and large opening to the kitchen. The hidden architect in me wants to say “you missed a spot,” as the effect is a little bit like saying “hey, how about in the living room we feature twelve sheets of cheap drywall as a major art piece?” If I could wave a magic wand and make them go away, I would.
But I have no magic wand, so I do what I can. In this case, I am showing a new horizontal trim piece with linear LED lighting pointing upwards, just like a cove light, but located far below the ceiling. This effectively breaks up the “mass” of sheetrock and adds what we designey types call “visual interest.” When we get to entries, I’ll try to remember a photograph of this effect, it is quite lovely. But if you can, add windows, an interior balcony…something else.
It may be hard to believe, having just trudged through a number of different solutions for the Comfort Zone and Glare Zone that there are two more zones to consider. I’ll tackle the Work Zone and Safety Zone in a future post, as soon as my hand recovers from sketching all those little dashes….
Read more of the Giving the Simple Gift of Light series HERE.