Drumroll, please! Okay, that was unnecessary, but I do feel like celebrating this first post in my 2023 DON’T/DO THIS series. I did a run of these a few years back that were featured on Houzz.com, but I’m older, wiser, and…well, at least older. So here I go again, revisiting, revising, expanding, and enhancing my pocket guides to better lighting.
And there may be no better place to start than a kitchen, the only room in the house where bad lighting can lead to accidentally amputated fingers, and the only room in the house that cannot be solved with floor lamps. Getting lighting right in the kitchen has to be done the first time, or you will likely be stuck with bad lighting for decades to come.
Fair warning: any single blog post that claims to provide everything you need to know about any aspect of lighting is a phony. While I simplify kitchen lighting down to two lists of the most common failures and successes, there are always occasions where these rules will not apply. And there is no substitution for carefully planned, expertly chosen work that accounts for all of the scientific, physiological, psychological, technological, and aesthetic aspects of light.
But sometimes you just need some help getting going in the right direction. I hope this helps.
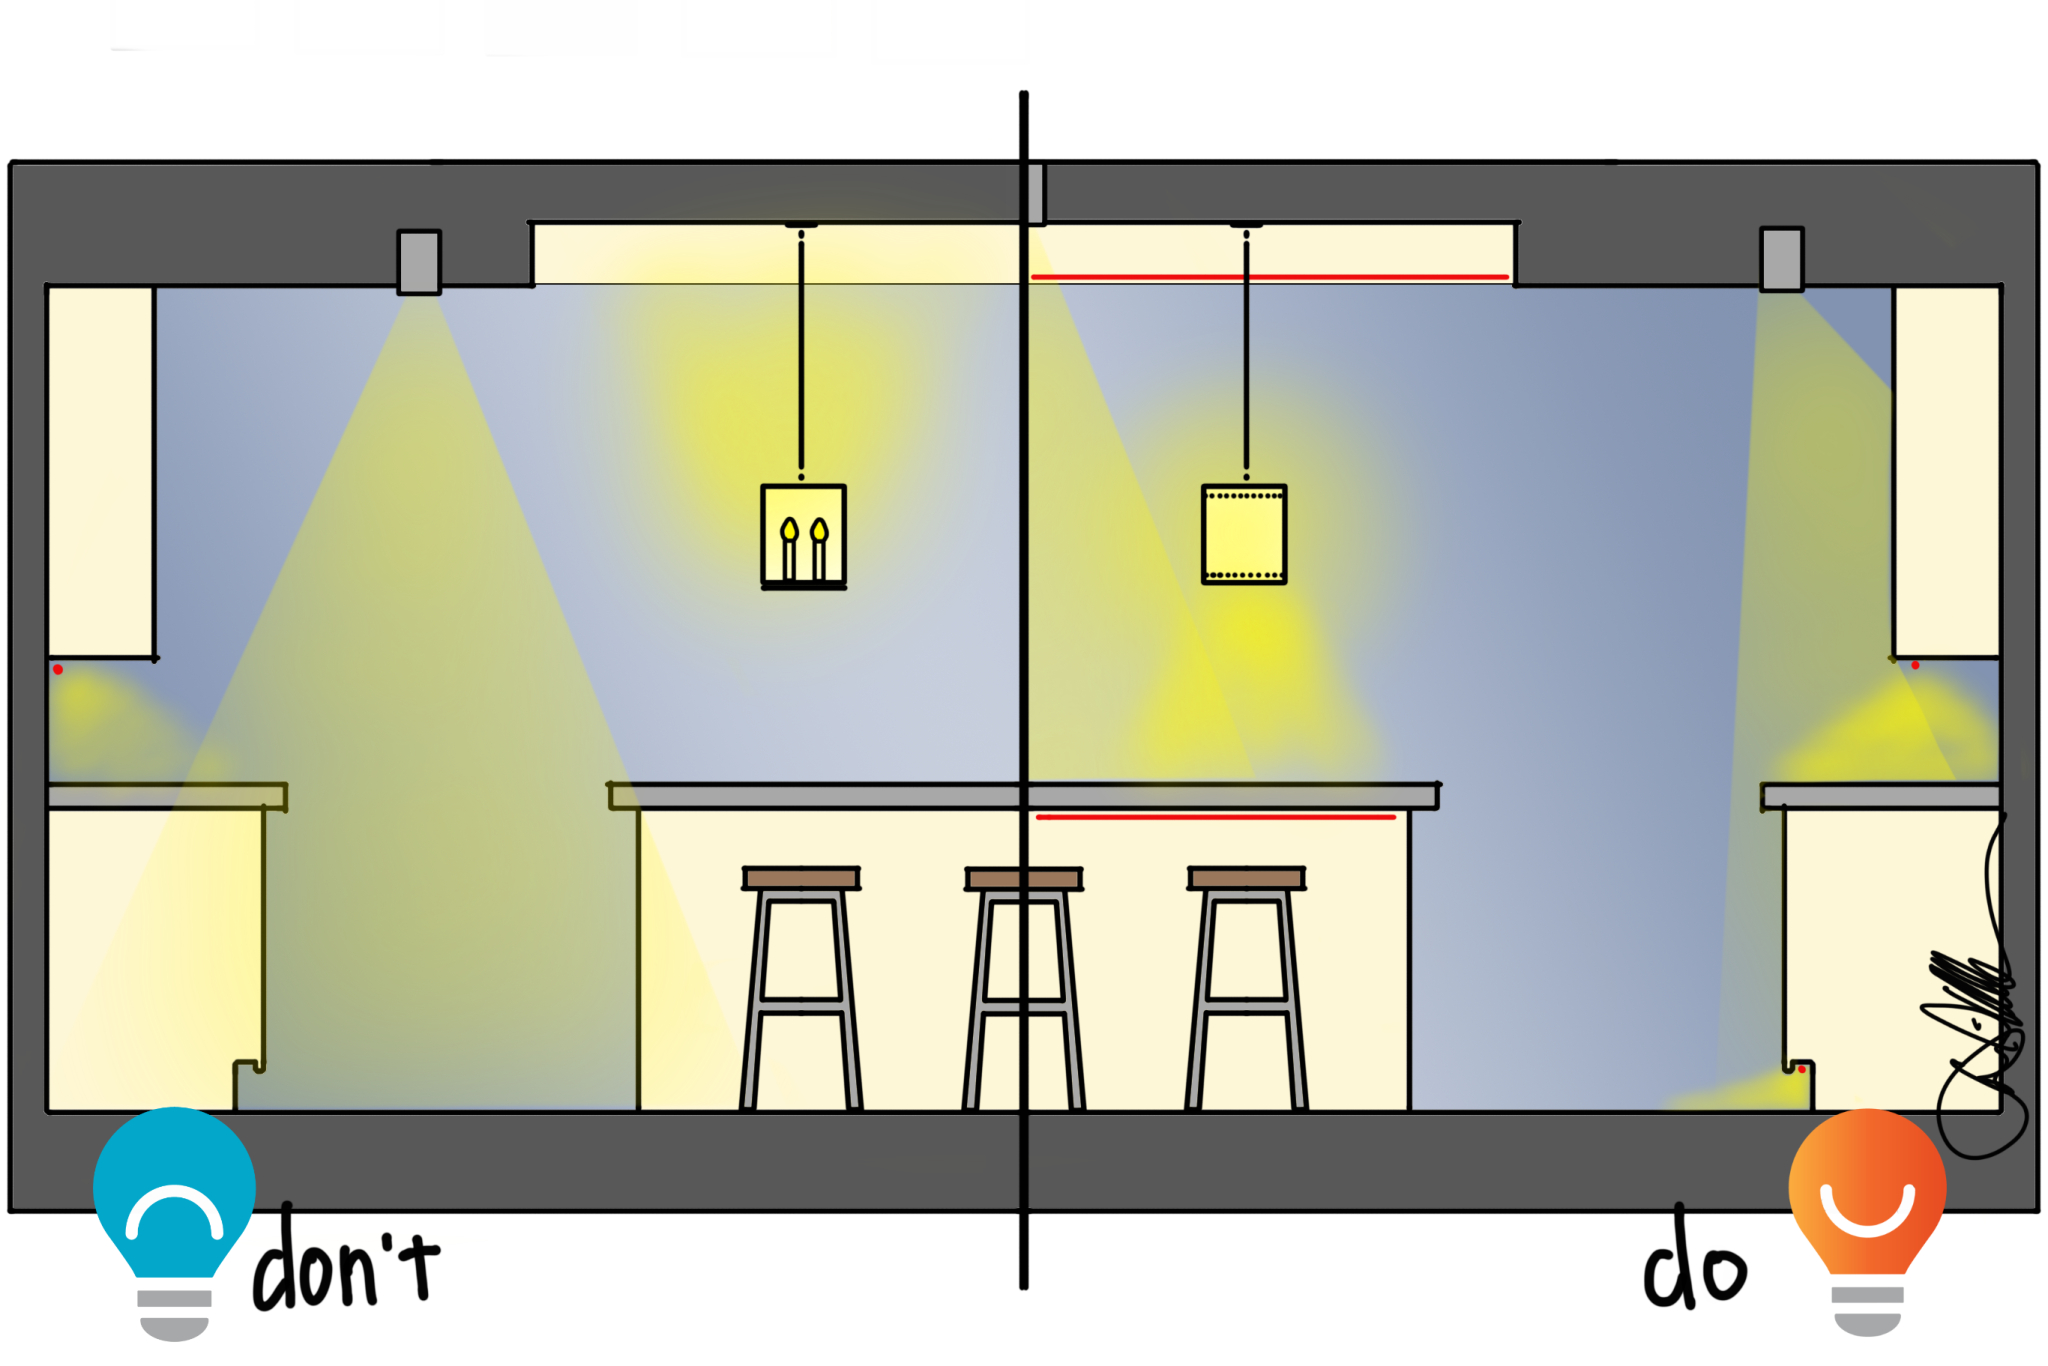
Let’s start with a section view of a sample kitchen that features a central island flanked by cabinets and counters, a ceiling cove (also called a tray ceiling), and decorative pendants over the island.
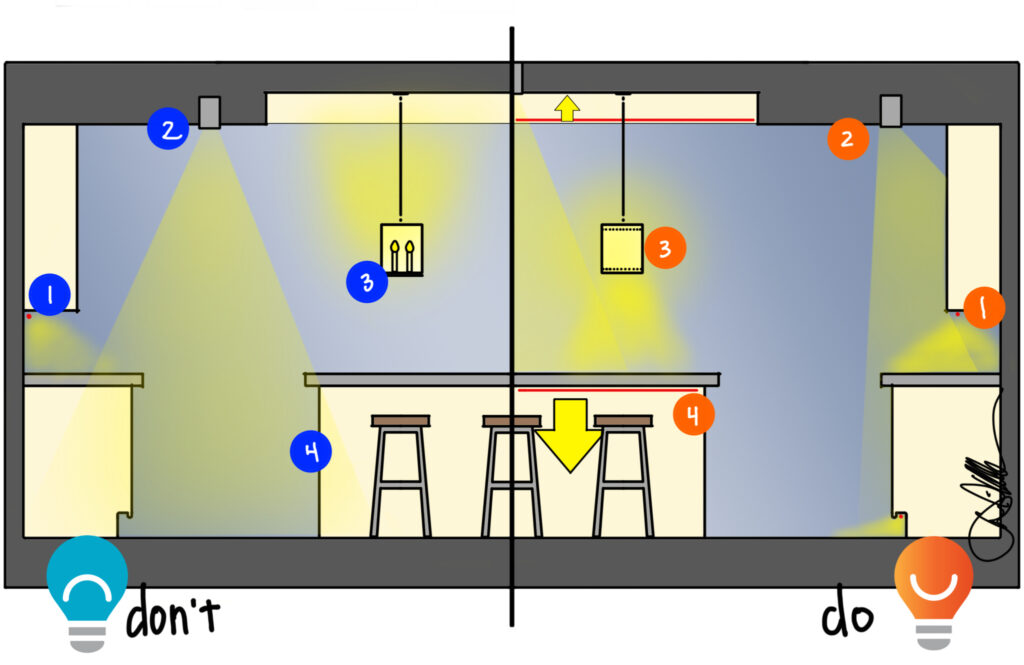
Here are a few mistakes to avoid:
- Undercabinet light at the back of the counter. This places light where it will do the least good for prep and countertop use and may deliver more glare.
- Recessed downlights over the floor. There is no good reason to light the floor directly and then leave counters and cabinets to fend for themselves. Light over the floor is great for pets and mopping, but terrible for anything a human wants to do in a kitchen.
- Pendants that don’t deliver. Too many islands are illuminated by pendants that do a much better job of lighting the ceiling and looking pretty when they should be providing good light for the countertop. Clear glass or open fixtures can also be the worst source of glare and discomfort, even if it is subconscious.
- Lower-level darkness. We are conditioned to be afraid of the dark and reflexively avoid putting our feet into dark holes. Dark spaces underneath island tops will be far less comfortable and inviting when left dark.
Replacing the Don’ts above with the following Do’s below can go a long way to brightening your kitchen, all while reducing glare and increasing beauty.
- Undercabinet light centered over countertops. Put light where it is needed in the front and middle of the countertop and it will be much easier to prep, cook, and clean. Plus, these lights make for great evening lighting when fixing a snack or drink.
- Recessed downlights over countertops. A good house rule of lighting design is to light the things that need lit…it is surprising how often this is not followed. Place recessed downlights near the counter’s edge and use adjustable downlights that can tilt towards the cabinets. The cabinets get light that makes the kitchen feel brighter and the counter gets much better task lighting.
- Pendants that work. If you can only light your island with pendants, look for those that put more light down towards the counter than in any other direction. Shades of frosted glass or linen-style fabrics can deliver soft, comfortable light on faces and make the kitchen more inviting.
- Lower-level under-bar lighting. Chase away disconcerting darkness with light under bar tops. This layer of light makes a space more comfortable and provides excellent light for moving around after sunset.
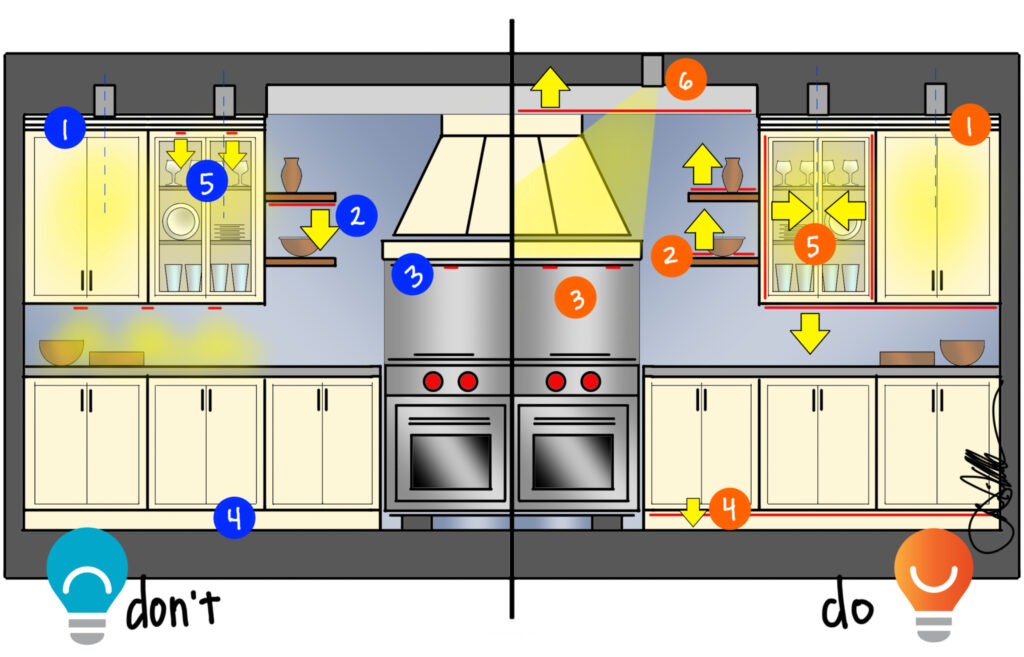
Imagine that behind the kitchen island is a wall of cabinets, a few open shelves, and a lovely range and hood. I see kitchens like this over and over, but most of them are lit “the way we’ve always done it,” which is another way of saying “we don’t know a better way so we’ll stick with what no one has complained about yet.”
Here are some mistakes to avoid:
- Misaligned downlights. Downlights will cast scallops on cabinets that can be distracting if they follow no visible logic. Ignore the ceiling geometry – it is the cabinet fronts that matter.
- Open shelves with light in your eyes. Any light above your eyes pointing down will be a potential source of uncomfortable glare.
- Weak range hood lighting. CFM and style are important considerations when buying a range hood, but lighting should not be overlooked. It is very, very difficult to improve lighting underneath a range hood after the fact.
- Lower-level darkness. Dark toe kick areas can deliver the same subconscious discomfort as below an unlit bar top.
- Glass door glare. Too many glass cabinets are illuminated with pucks at the top, probably because it is the easiest solution. But that approach blinds us every time we look up into the cabinet.
Here are a few techniques for getting better lighting:
- Aligned recessed downlights. Line up recessed downlights with the centers or edges of upper cabinets to create a rhythm that adds to the beauty of the millwork rather than distracts.
- Open shelves with indirect light. While indirect light in open shelves will be a little less practical, the results can be glare-free and far more comfortable.
- Range hoods with power. Make sure your range hood solution will deliver plenty of light, ideally from at least four bulbs or high-output LED strips.
- Lower-level lighting. Lighting toe kicks is not just for drama or comfort. Horizontal lines of light at the floor can improve balance and reduce the risk of falls, all while being less sleep disruptive than overhead lights.
- Glare-free glass cabinets. Vertical light on the sides of cabinets can look beautiful and provide terrific functional light. Be sure to put these on a dimmer as too often they are left too bright.
- Illuminated features. A beautiful feature like a custom range hood can be lost in the darkness if not carefully illuminated. In this example, I use an adjustable recessed downlight to highlight the hood.

The final view shows many of the do’s and don’ts listed above, but there are just a few we haven’t covered yet.
Try to avoid these:
- Missed details. Tray ceilings, coffers, and coves all cost money and look great, but leaving them dark robs you of their beauty any time the sun is down.
- Shadowed counters. Puck lights were an amazing tool for countertop lighting, but linear LED strips can deliver a far superior experience.
Do this instead:
- Illuminated details. Light the cove, tray, or coffer with linear strips to reveal the detail. This looks terrific, especially when dimmed low, and has the added benefit of filling in some shadows throughout the kitchen.
- Islands that perform. Consider adding a few recessed downlights over the island, between or around any pendants. These can push useable light to the counter, allowing the pendants to be comfortably dimmed for a more comfortable feeling without sacrificing performance.
- Light on tall cabinets. Pantry cabinets, floor-to-ceiling cabinets, wall-ovens, and paneled refrigerators need light, too. Placing the lights and adjusting them just as the countertop lights are done will lend consistency to the project and provide great light on and in the cabinet.
Whew. This may be the longest post of this series (there may be no other room as complicated as a kitchen). Maybe I should have started with a closet….