It is no big secret that I love light and enjoy finding new ways to deliver it to our lives. As a professional lighting designer, I spend a good deal of energy dreaming up solutions to everyday challenges and spend time regularly learning about new products and new techniques. There is plenty of discovery in my work, and that keeps it fun.
It can also make my lighting designs difficult to install.
Delivering lighting designs that delight, amaze, and work well inevitably means I am asking builders and electricians to do things they have never done before. It is easy for me (and I suspect easy for other lighting designers, too) to forget that what is no problem for me to draw can create unwelcome challenges for installers. Many of the solutions I present have already been installed somewhere by someone, but that does not make it much easier for an installer who wasn’t involved in those other projects.
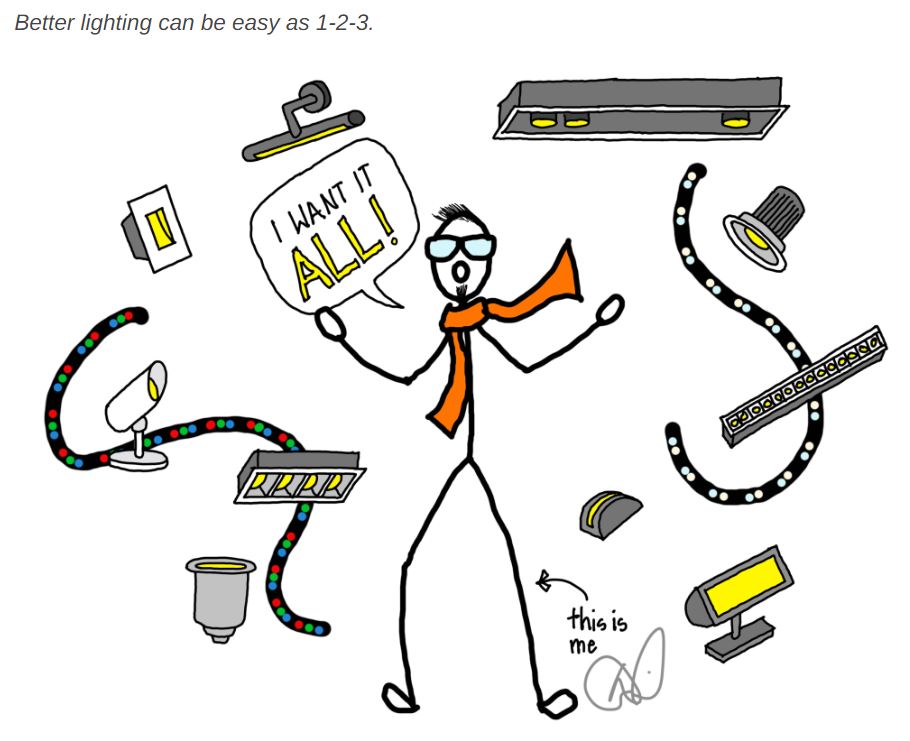
I want it all, of course, but perhaps I could remind myself that narrowing down to a few solutions- and repeating them over and over- could make life easier for everyone involved. As a bonus, when we simplify we make it possible to reduce our prices, making better lighting more affordable to others. And that is a big win. So how can we get there?
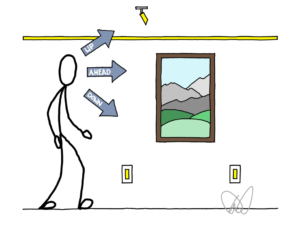
I was sketching through this question when a pattern emerged: I was choosing a solution for each of three zones (comfort, glare, and safety). This took care of light ahead of the viewer, up above the viewer, and down by their feet. In other words, these three (little) solutions could have a big impact on occupant comfort and wellbeing.
One word of caution: please consider the following suggestions as additions to existing lighting in the home. Illuminating a space with only these three solutions could leave the work zone dark. Additional overhead lights, lamps, and undercabinet lighting are a few of the strategies that could complete the design.
This list is intended to provide three relatively easy – and relatively inexpensive – ways to improve lighting in every home.
Up ahead of us, in our near field of vision, is an area I like to call the comfort zone. This is where our eyes naturally and comfortably rest, and so much of the beauty we perceive is in this zone. It is here that we gaze into the eyes of a loved one, where we see out the window to a beautiful sunset, where we admire art on a wall, where we watch television…it is, in other words, the most important place to have good lighting.
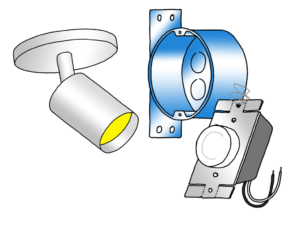
Monopoints are surface-mounted adjustable spotlights that allow aiming in nearly any direction. This flexibility exceeds the flexibility of any recessed downlight, allows for more precision focusing than any linear strip light, and is available in cost-conscious versions that install simply to a round ceiling box.
I suggest placing monopoints about 18” to 24” from a typical wall (higher for tall ceilings), centered on wall sections. If the wall is big enough for two paintings or pieces of art, consider using 2-3 monopoints to provide adequate coverage. Planning to hang a TV there? Skip that section of the wall. Connect them to dimmers for easy adjustment to finish off well.
Monopoints are also my preferred solution for illuminating spaces with sloped ceilings, like cathedral ceilinged great rooms. These versatile fixtures can adapt to the ceiling slope and still aim where needed: the walls, cabinets, chimneys, and spaces in front of us.
This one move will make a big difference in your project, but don’t stop there. At night, we can benefit from light that points in an entirely different direction: down.

If you (or your electrician) can install a receptacle (power outlet) and a light switch, you can add a layer of light that will transform the evening experience of anyone who uses the home. Recessed step lights are most commonly found on staircases outdoors and sometimes on staircases indoors, but I would like to rename them as something like “indoor path lights” or “nighttime path lights” to more accurately describe how we use them. Or, utilizing my zone theory, they could be called “Safety Zone Lights.” Of course, I’ll need to add “formerly recessed step lights” every time I use the term, like “formerly twitter” is added to every mention of the social media platform X. There are reasons that we stick with familiar terms, even if they might not be the best terms: change is messy.
Safety zone path lights – formerly recessed step lights (okay, I’ll stop) – come in versions that install in standard 2” x 4” wall boxes, the same boxes that take electrical receptacles. A simple switch is inexpensive and easy to install and can adequately control a series of these lights, though a switch with built in occupancy sensor can also be a good hands-free solution. They are extremely easy to install, but where should they go?
Nighttime path lights can be installed anywhere you walk at night, which is pretty much everywhere in a home. It can be easy to overdo it, though, so think through layout and space them about 8’ – 12’ apart as a general rule. One or two down a typical hallway will be adequate in most cases. I like to put them in water closets (toilet rooms) for late night usage, and in the transitions between rooms (like between a great room and a dining room). Add a few near entryways, and these are likely to become the most used – and most appreciated lights of all.
Why? Because our eyes are increasingly sensitive to light as the evening wears on, and as the sun sets. We need less and less light, but we still want a little to see where we are going when we move about the home. Recessed step/path lights are perfect for minimizing light in our eyes, which reduces glare, increases comfort, and potentially protects our sleep.
It is worth noting that this solution is labeled “down,” and not all recessed step/path lights are suitable for this use. Look for fixtures that point all the light towards the floor and shield your eyes from the source (bulb/bright area). You can read more about choosing step lights HERE.
These simple-to-install, cost-conscious path lights can elevate a home and provide a better experience every night. That’s a good deal.

Good lighting that points upwards and is softly reflected back into our glare zone, could be accomplished with indirect wall sconces that mount easily to standard wallboxes, and that would make it an affordable and attractive solution, but I want to push just a little bit and introduce linear (strip) lighting instead. Why not sconces?
Wall sconces that do a great job of delivering indirect light are easily found in the commercial sector, but rarely found in residential. That means most sconces will emit uplight in a concentrated pattern, not softly spread out as desired. As a result, the sconce option often creates hot spots of light on the ceiling and wall, which I personally find distracting. And they can be difficult to align with doors and walls in most homes, providing another source of distraction. Continuous linear lighting, on the other hand, can blend into the architecture, minimize glare, and provide a soft, even illumination to the ceiling and room.
But isn’t linear lighting difficult to install? Comparably, yes, but there are easier ways to make this move. One of my favorites is what I have come to call the “backband cove,” nicknamed after a piece of window molding that is almost the perfect size and shape for discrete indirect light.
Backband cove can be installed in just about any room, from the most plain and simple of white boxes to the most elaborately coffered ceilinged spaces. I like to drop about 12” – 18” below the ceiling (which sometimes aligns nicely with the tops of windows and doors) and place a horizontal piece of trim with a dadoed/routed channel in the top to hold linear tape light and channel. This piece can be only an inch or two deep and of similar width; it will almost disappear visually. Good linear tape light, installed continuously, will provide a lovely soft light throughout the space, almost like a summer sky. Because the area above our heads is in our peripheral vision, where we are most sensitive to light, this becomes a glare zone and it can be beneficial to avoid bright lights pointing down towards us. Backband cove is a perfect solution.
Yes, it will take more work to plan and prepare for backband coves. You will need the trim piece, tape light, remote drivers, and special low voltage wiring. You may need to pull multiple home runs to a single cove, depending maximum run length requirements of the product. You may need a special dimmer. If you are hesitant, try it out in one room of your house. A primary bedroom can be a good place to start, but dining rooms and living rooms are also good choices.
Some solutions are easy out of the box; backband cove will be easy with practice. If we choose to focus on this one single uplight solution, builders and electricians can get familiar with it and it will become less expensive to include.
Sometimes it can be fun to pull out all the stops and craft an elaborate, unique, stunning lighting design. For most of us, however, the lighting included in our homes is often just a single light fixture in the middle of the ceiling. This leaves our comfort zone dim, our glare zone too bright, and our rooms too bright at night. Three little solutions- monopoints in the comfort zone, path lights in the safety zone, and backband coves in the glare zone- can make a big difference.