Straight from the depths of the mind of a lighting designer, here comes another fascinating, edge-of-your-seat, page-turning buying guide for the most exciting of all light fixtures: under-cabinet LED tape light. Oh yeah!
Buying LED tape light (those tiny flexible LED strips with adhesive backing) would be easier if it weren’t for the seemingly endless options available to the consumer. One manufacturer alone might offer ten “families” of tape light, each with a half-dozen color temperatures, perhaps multiple voltage options, dimming and control options, and a dozen aluminum channels, each with three different acrylic diffusers…you get the idea. That’s why people like me exist: we delight in going through all the options to find the perfect product. Sometimes.
So let’s keep it simple. I may just use this guide myself.
Step One: Choose a Product
Here’s the quick answer: Look for tightly spaced LED tape light (also called flexible linear product) with a CRI of 90+, around 250 lumens per foot, and in 2700-3000K for warm-toned spaces and 3000-3500K for cool-toned spaces. Now, for those of you who want to know why, let me explain:
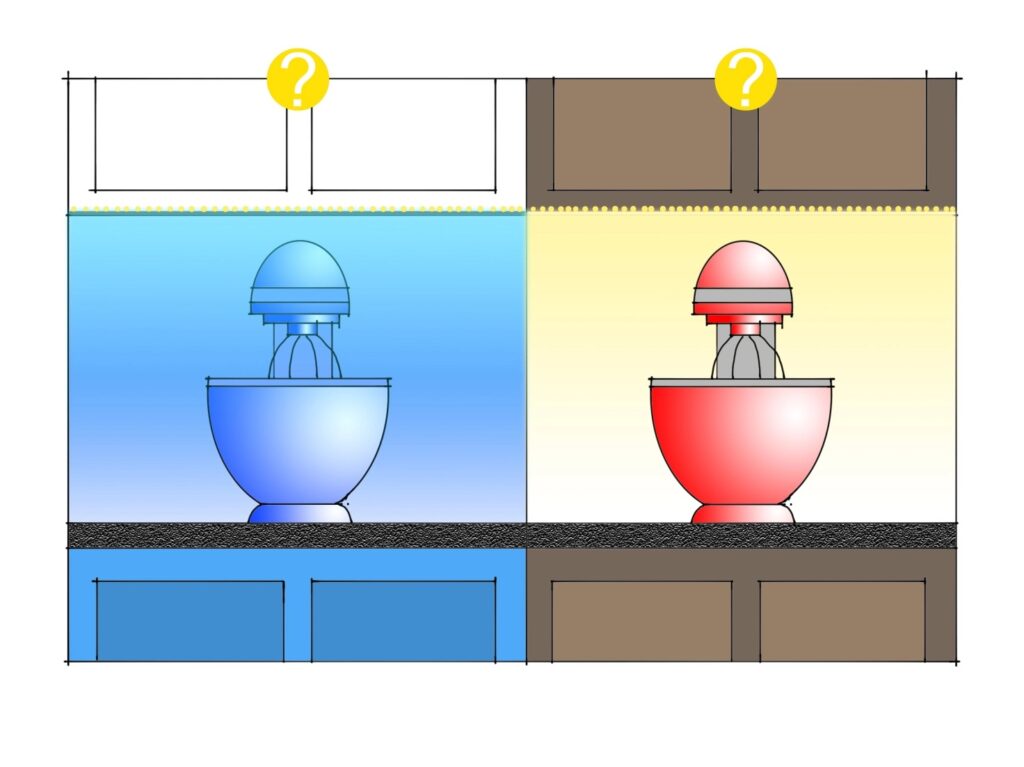
One reason I like LED product is the ability to minimize shadows. In the sketch above, the traditional “puck” style system on the left leaves the mixer bowl and moving parts in the dark. On the right, a tightly spaced LED tape (where the individual LED diodes are close together on the tape) minimizes shadows. Anywhere there are moving parts, cookbooks to read, or knives to avoid, this just makes sense.
CRI, or Color Rendering Index, is a tool we use to determine whether…hmm…whether the light will look “right” or “wrong.” Under high CRI lighting, colors look the way they would on a good sunny day, such as on the left. Under low CRI lighting, some colors may lose their luster or look the same as others. If you have ever bought a sweater and found out it was a different color at home, you’ve encountered high and low CRI light sources. Today, stick to CRI’s of 90+. You may pay a little extra for it (and NEVER go below 80), but it is usually money well spent.
Don’t spend the money to wire and install tape light that is not going to do the job. Pay very close attention to how many lumens-per-foot the product emits. I shoot for around 225-275 lumens-per-foot for most countertop applications. If you like it extra bright, look for 300 lumens and be sure to install a compatible dimmer for late at night.
Color temperature- essentially the measurement of a light source’s closeness to warm/amber or cool/blue- depends primarily on the paint, countertops, backsplash, flooring, cabinets, and appliances in your kitchen or room. As a rule of thumb, I prefer 2700-3000K (that’s degrees Kelvin, I won’t hit you with the technicalities because I barely comprehend them myself on a good day) for warm-toned, natural-wood-featuring, traditional, transitional, and soft-modern spaces. If you have a very cool-toned space with lots of cool greys, blues, and cool whites, lean towards 3000-3500K.
Got it? Now let’s choose a channel to lend the tape a more finished look.
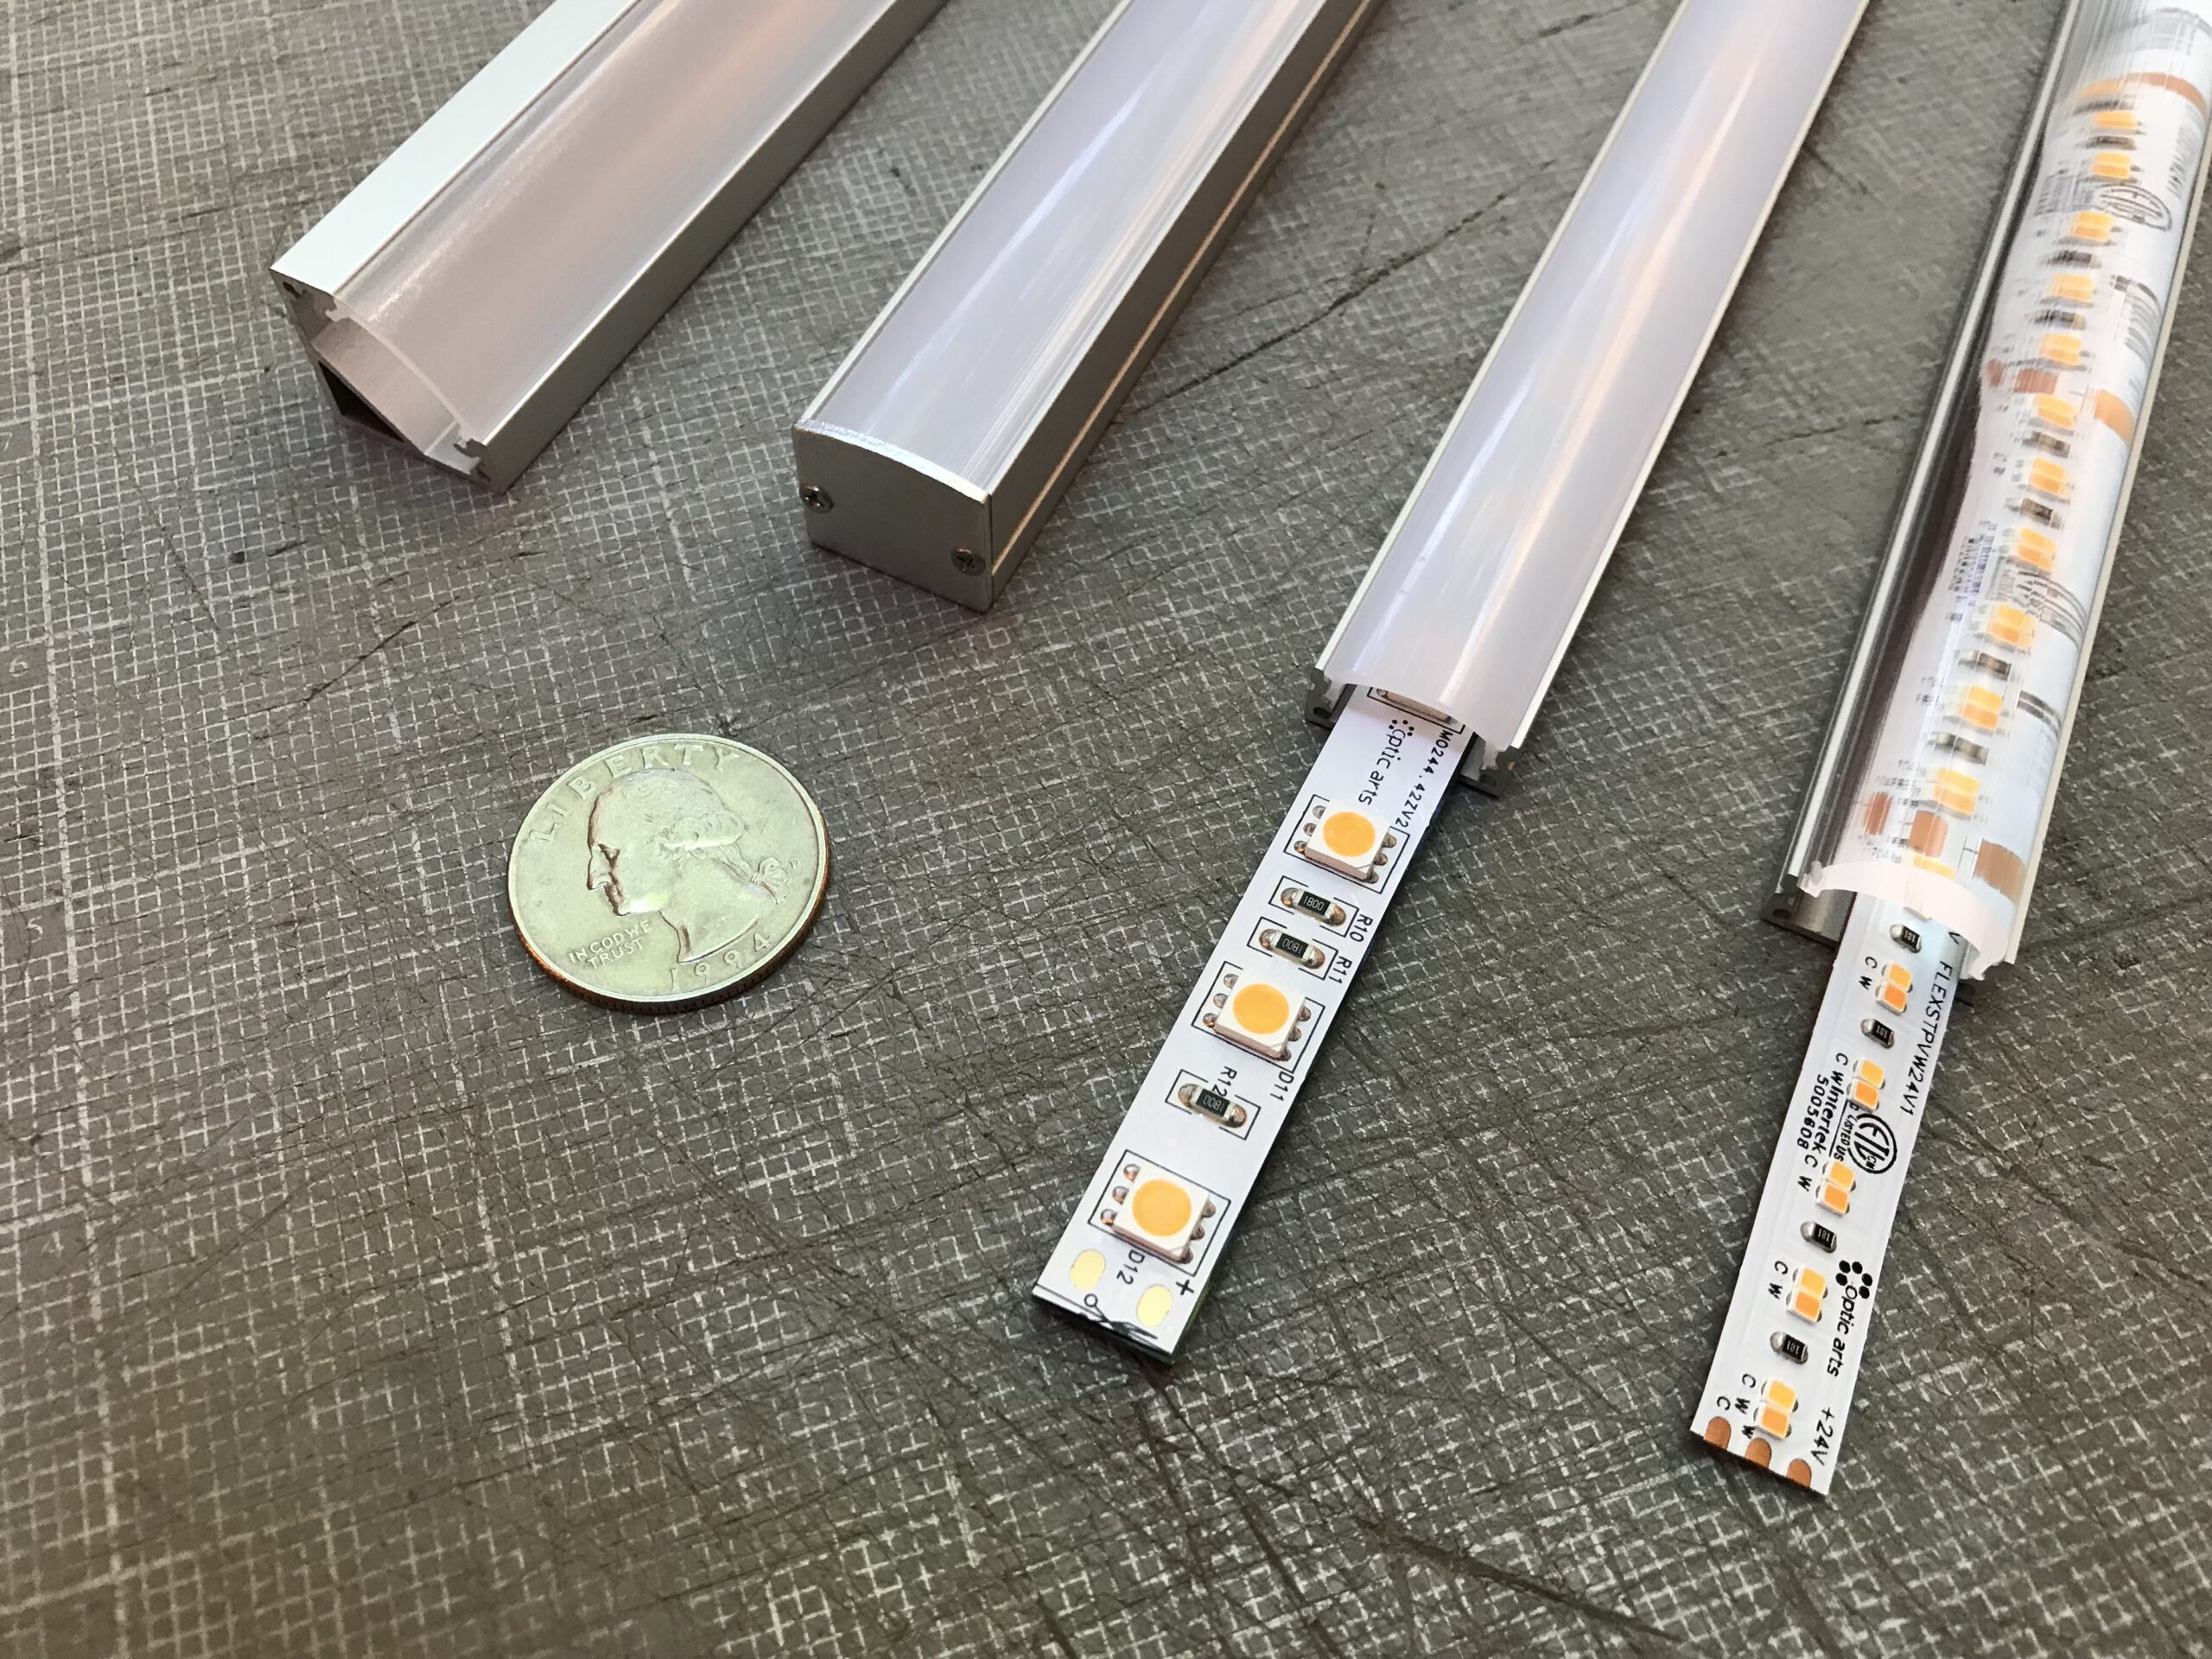
Step Two: Choose a Channel
For under cabinet installations, an aluminum channel with frosted acrylic lens can provide a cleaner look than bare tape, soften the appearance of the light, and help dissipate the heat.
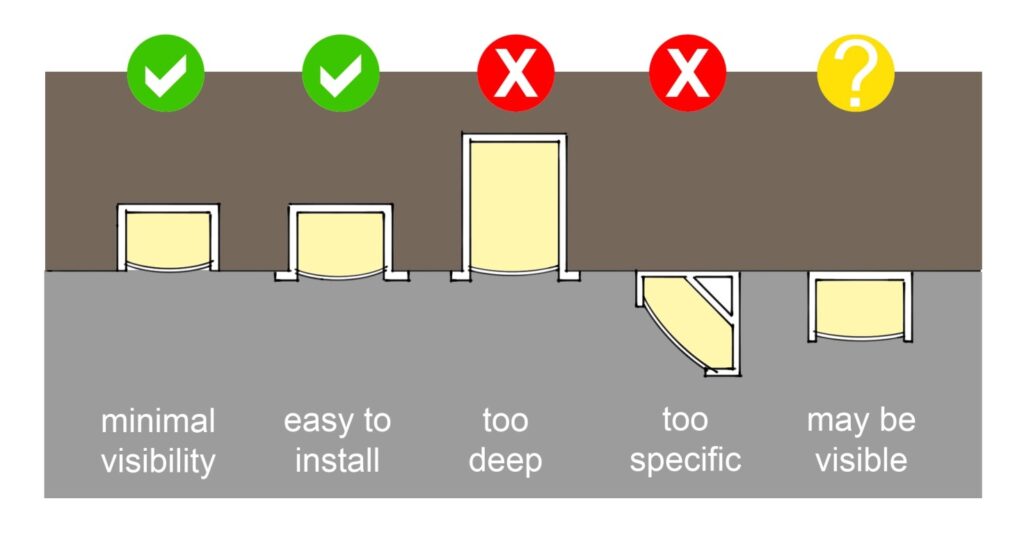
The first three examples above are for use when recessed into the underside of a cabinet, shelf, or false bottom to an upper cabinet. Good woodworkers can use the first style without flanges for the cleanest look. If your carpenters are doing the installation after the cabinets are complete, the second option, with tiny flanges, can cover up the edges of cuts. The third option is typically too deep and will take up space in the cabinet and capture too much light.
Angled channels are also available, but are best used inside glass fronted cabinets, installed vertically. Above a counter, they will often direct too much light back at the wall and leave the front of the counter dark.
The same tiny flange-less channel as the first can also be surface-mounted underneath a cabinet, as shown in the last detail. But be careful: you’ll want a wood trim piece to conceal it unless you love seeing bare aluminum.
Once you pick your channel, make sure it goes in the right place by getting the installation detail right.
Step Three: Choose a Detail
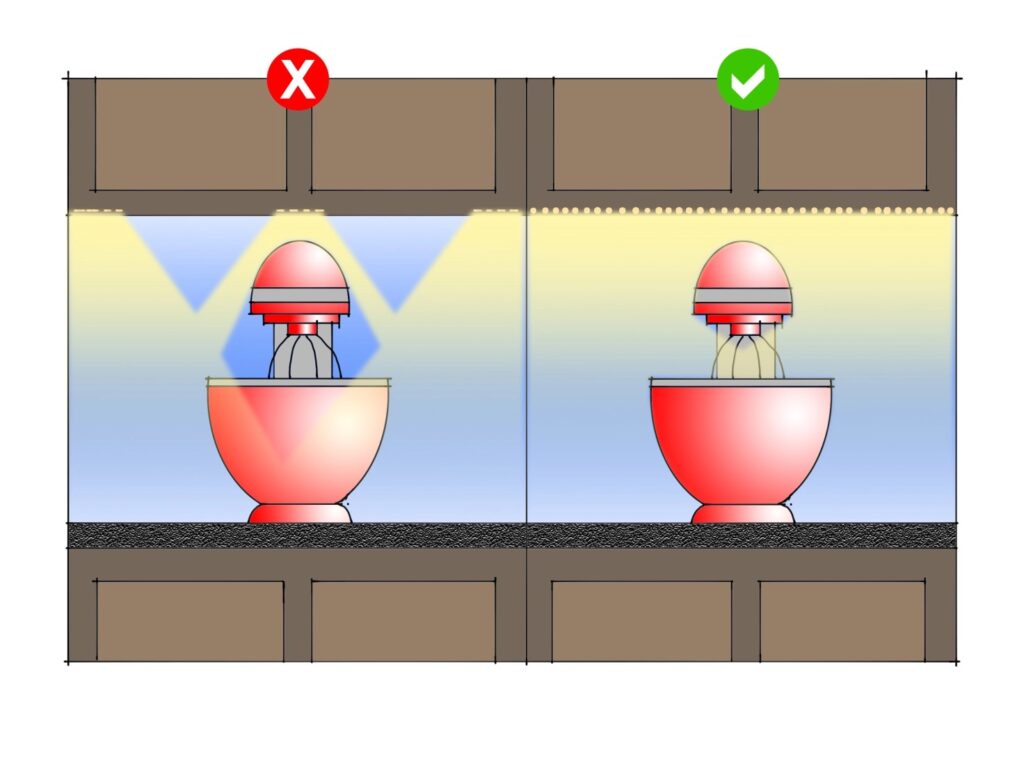
I’ve seen tape light installed in a lot of different ways, usually without much thought as to how the light will actually affect the countertop. A few simple guidelines will make this last- and crucial step- easier.
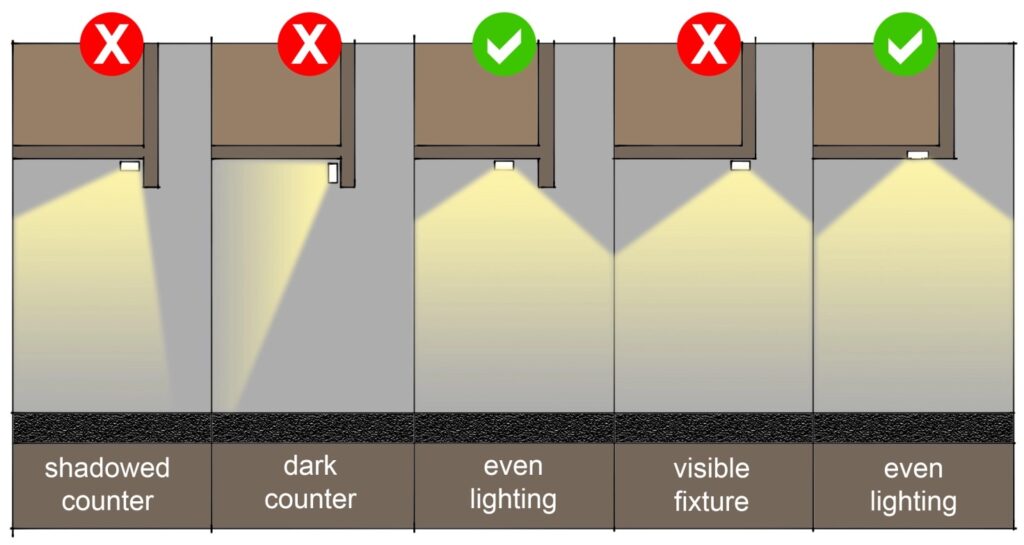
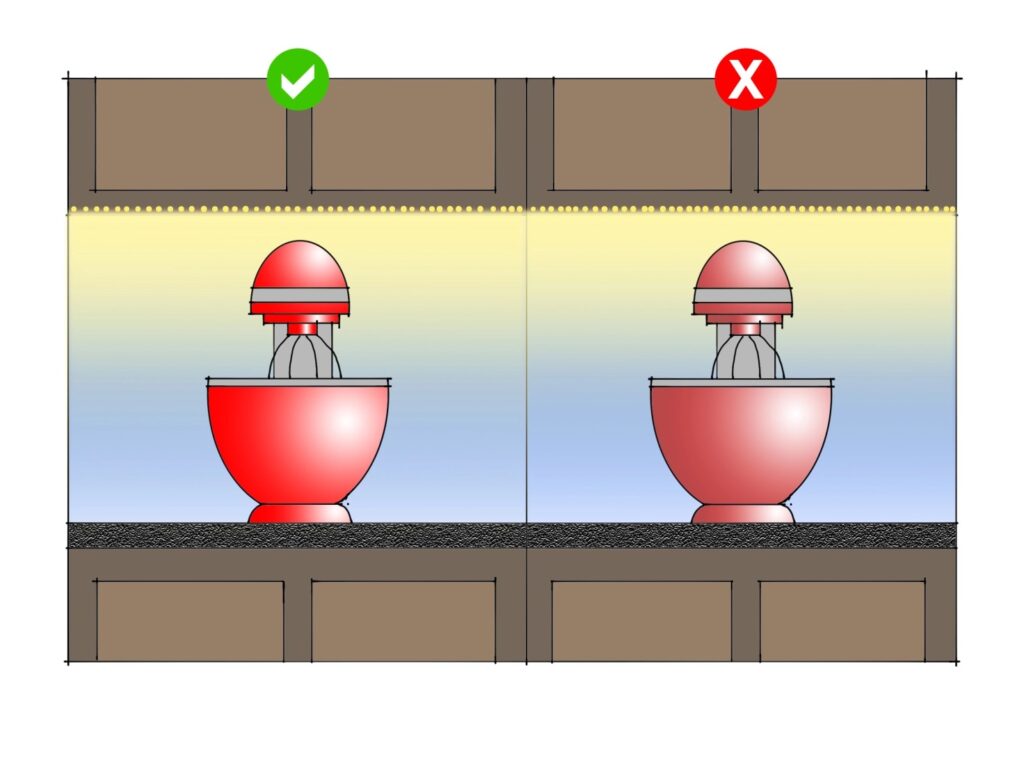
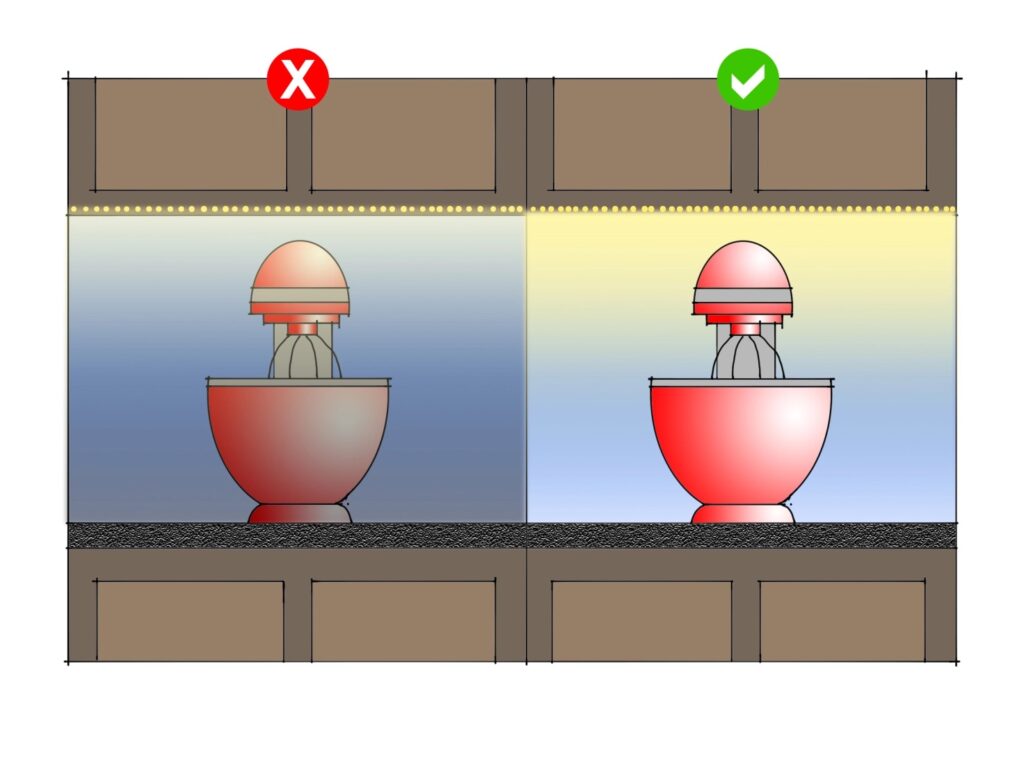
The first three examples in the sketch above show different positions of tape light with cabinets featuring a valance or face frame that creates a “lip” below the cabinet. This lip can be used to hide the tape light from view, but can also block the light and create a harsh shadow on the countertop if placed incorrectly (see the first example). In the second example, the tape is mounted directly to the back side of the lip and faces back. This puts the brightest spot where most of us cannot even see- at the top of the backsplash- and does a horrible job lighting the counter. The third example is just right.
The second group of examples is for cabinets with a flush bottom. Unless you like seeing aluminum hardware, I recommend avoiding surface-mounted installation. Have your contractor or cabinet manufacturer cut a recess into the bottom of the cabinet and conceal your tape light.
Whew. That’s it.*
*Of course, there could be other details to discuss. Like what kind of power supply and dimmer to buy, how to route the wires behind or through cabinets, and whether or not you should buy color-changing LED tape for your once-a-year disco party. But most manufacturers will provide an appropriate power supply and recommend dimmers, and chances are your electrician has installed tape light under cabinets sometime in the past 36 hours. And save the color-changing lights for elsewhere in the house; I can help you lay out the perfect disco party system.